Touchless Music Player
ECE 5725 Project
Tamzid Ahmed (ta326) and Claire Caplan (crc235)
05/19/2021
Demonstration Video
Objective
Touchless music player uses a Raspberry Pi to function as a jukebox by allowing users to make their own personalized playlist and select a song to be played from the playlist on a speaker connected to the Raspberry Pi. Each user has their own QR code that they need to scan so that their playlist can be displayed on piTFT from which they can select the song that they want to play through hand gestures
Introduction
The project started with installing opencv and required libraries on Raspberry Pi. We installed piCamera and integrated it with openCV to detect QR code when the user holds the QRcode in front of the camera. We wrote a python script to detect the QRcode using openCV and qrcode library from python. Next we collected all the required parts needed for the hand gesture recognition circuit. We used Adafruit break beam sensors for song selection, play/pause and an ultrasonic sensor to control the volume. The explanation of how the circuit works will be explained in the design section. Once we made a schematic for the hand gesture and checked the correctness of the circuit with the TAs we tested the circuit by checking the piscope signal and writing python scripts and checking the outputs in the terminal. After that we wrote a script to control song selection using IR sensors and volume control using ultrasonic sensors. Once the song selection was working, we had to integrate the QR scanning with song selection so that once the users scan their QR code, they can play music using hand gestures. We also added an option for a new user to receive a QR code and select the songs that they want to be in their playlist. Once all the programming was done, we also made a 3D printed structure to hold the whole music system. Our device, as well as both team members, can be seen in Figure 1 below.
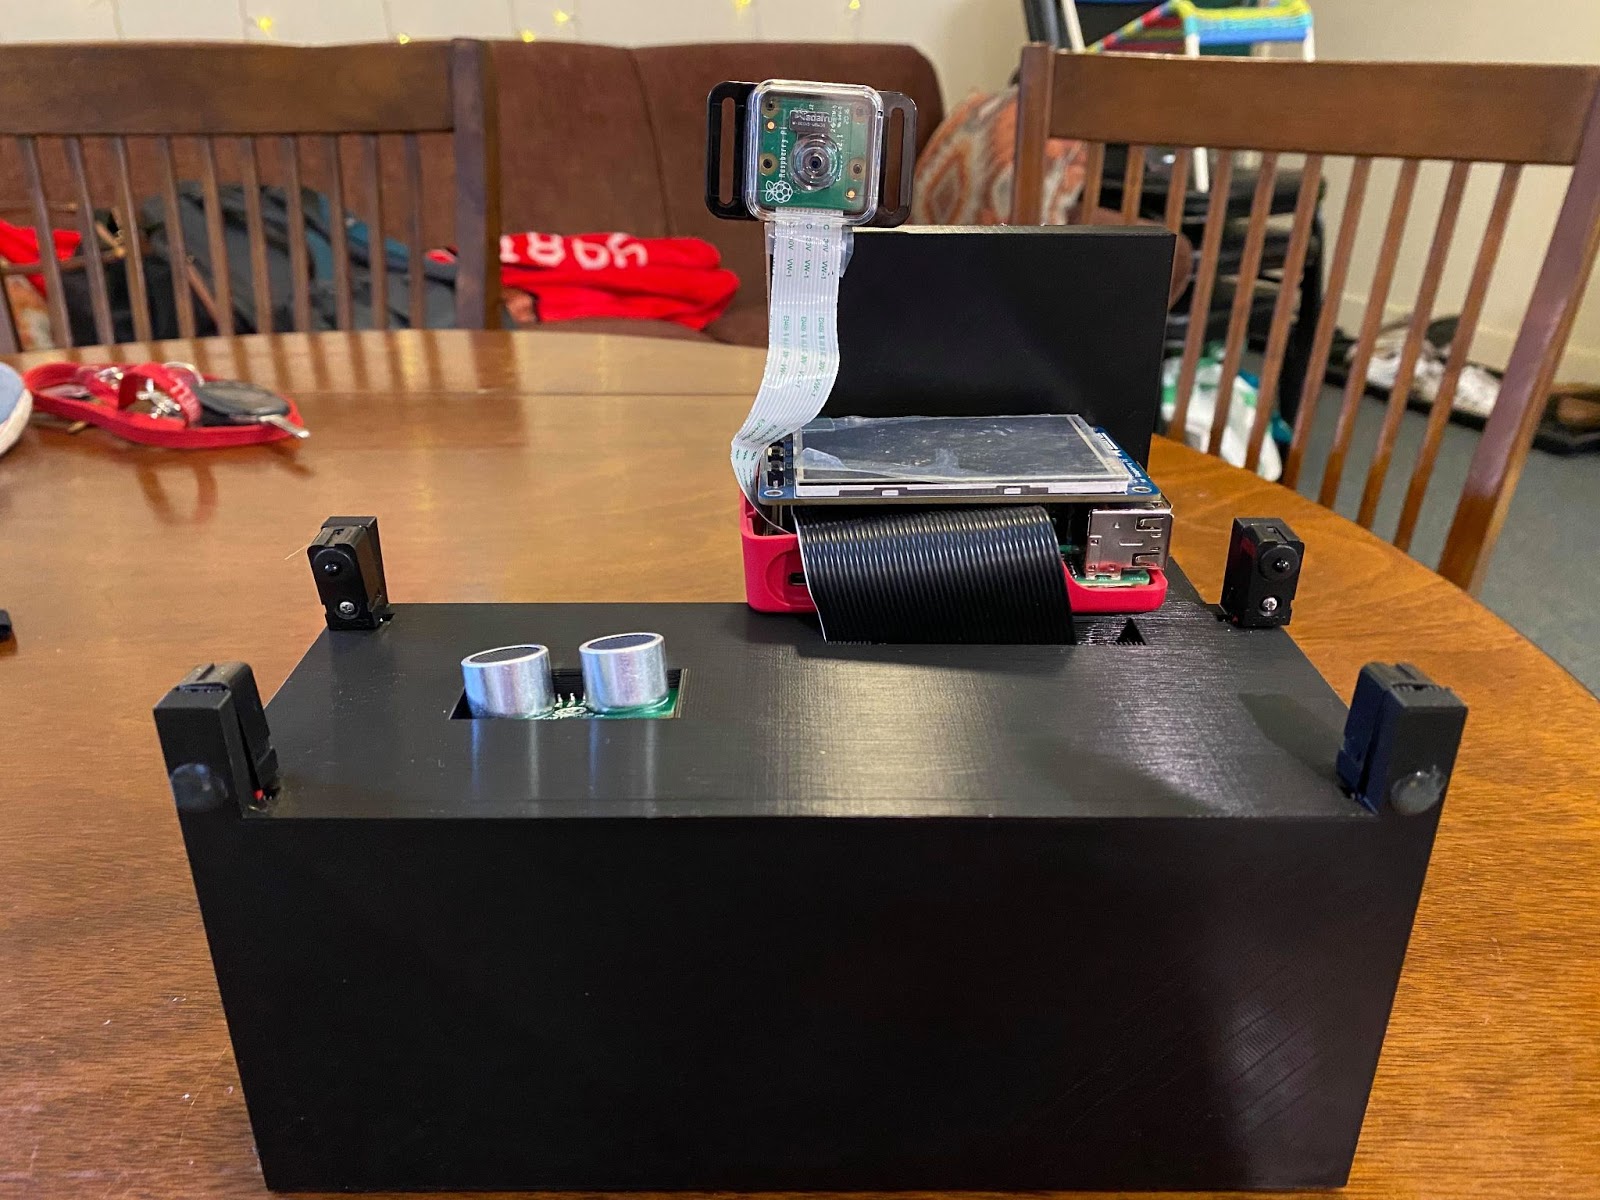
Figure 1: Finished “Touchless Music Player” prototype
Design
In the section below, we will have a more in-depth discussion on how each subsystem is designed.
QR Code Detection:
We began our project by first installing OpenCV on the Raspberry Pi. Following the instructions provided on Canvas, we were able to install OpenCV for Python3. Using a camera installation reference video from the Raspberry Pi official channel, we installed the PiCamera on the Raspberry Pi. Next we used the provided Canvas example on OpenCV to learn how to use OpenCV and to install the required libraries needed for OpenCV and QR code scanners [1]. Following the instructions in [1], we were able to write a python script qr_scanner.py that can scan a QR code using the PiCamera and show the message embedded in the QR code on the PiCamera window and the terminal. We tested the script by checking if the previously generated QR codes can be detected and if the message embedded in the QR code can be read by the camera. Once the script reads the data from the QR code, it checks if the username already exists in a text file called netid.txt where we stored all known users in the system.
All the testing early in the project development was done on the desktop, where the Pygame GUI and camera feed were in two separate windows like in Figure 3 below.

Figure 2: Desktop testing of camera scanner code
We wanted our project to be deployed on a standalone Raspberry Pi and thus we needed the camera window to show up on the PiTFT display. Initially we could not get the camera window to show up on the PiTFT display as our program would just hang and the PiTFT would not respond to any further inputs. After following references from the Air Canvas project from Fall 2019 we were able to make the camera window show up on PiTFT. We needed to rescale the PiCamera feed window to PiTFT screen size(320x240) and render the camera display on the Pygame window, which we implemented in a helper function, and then the camera feed showed up as expected. This is seen below in Figure 3.
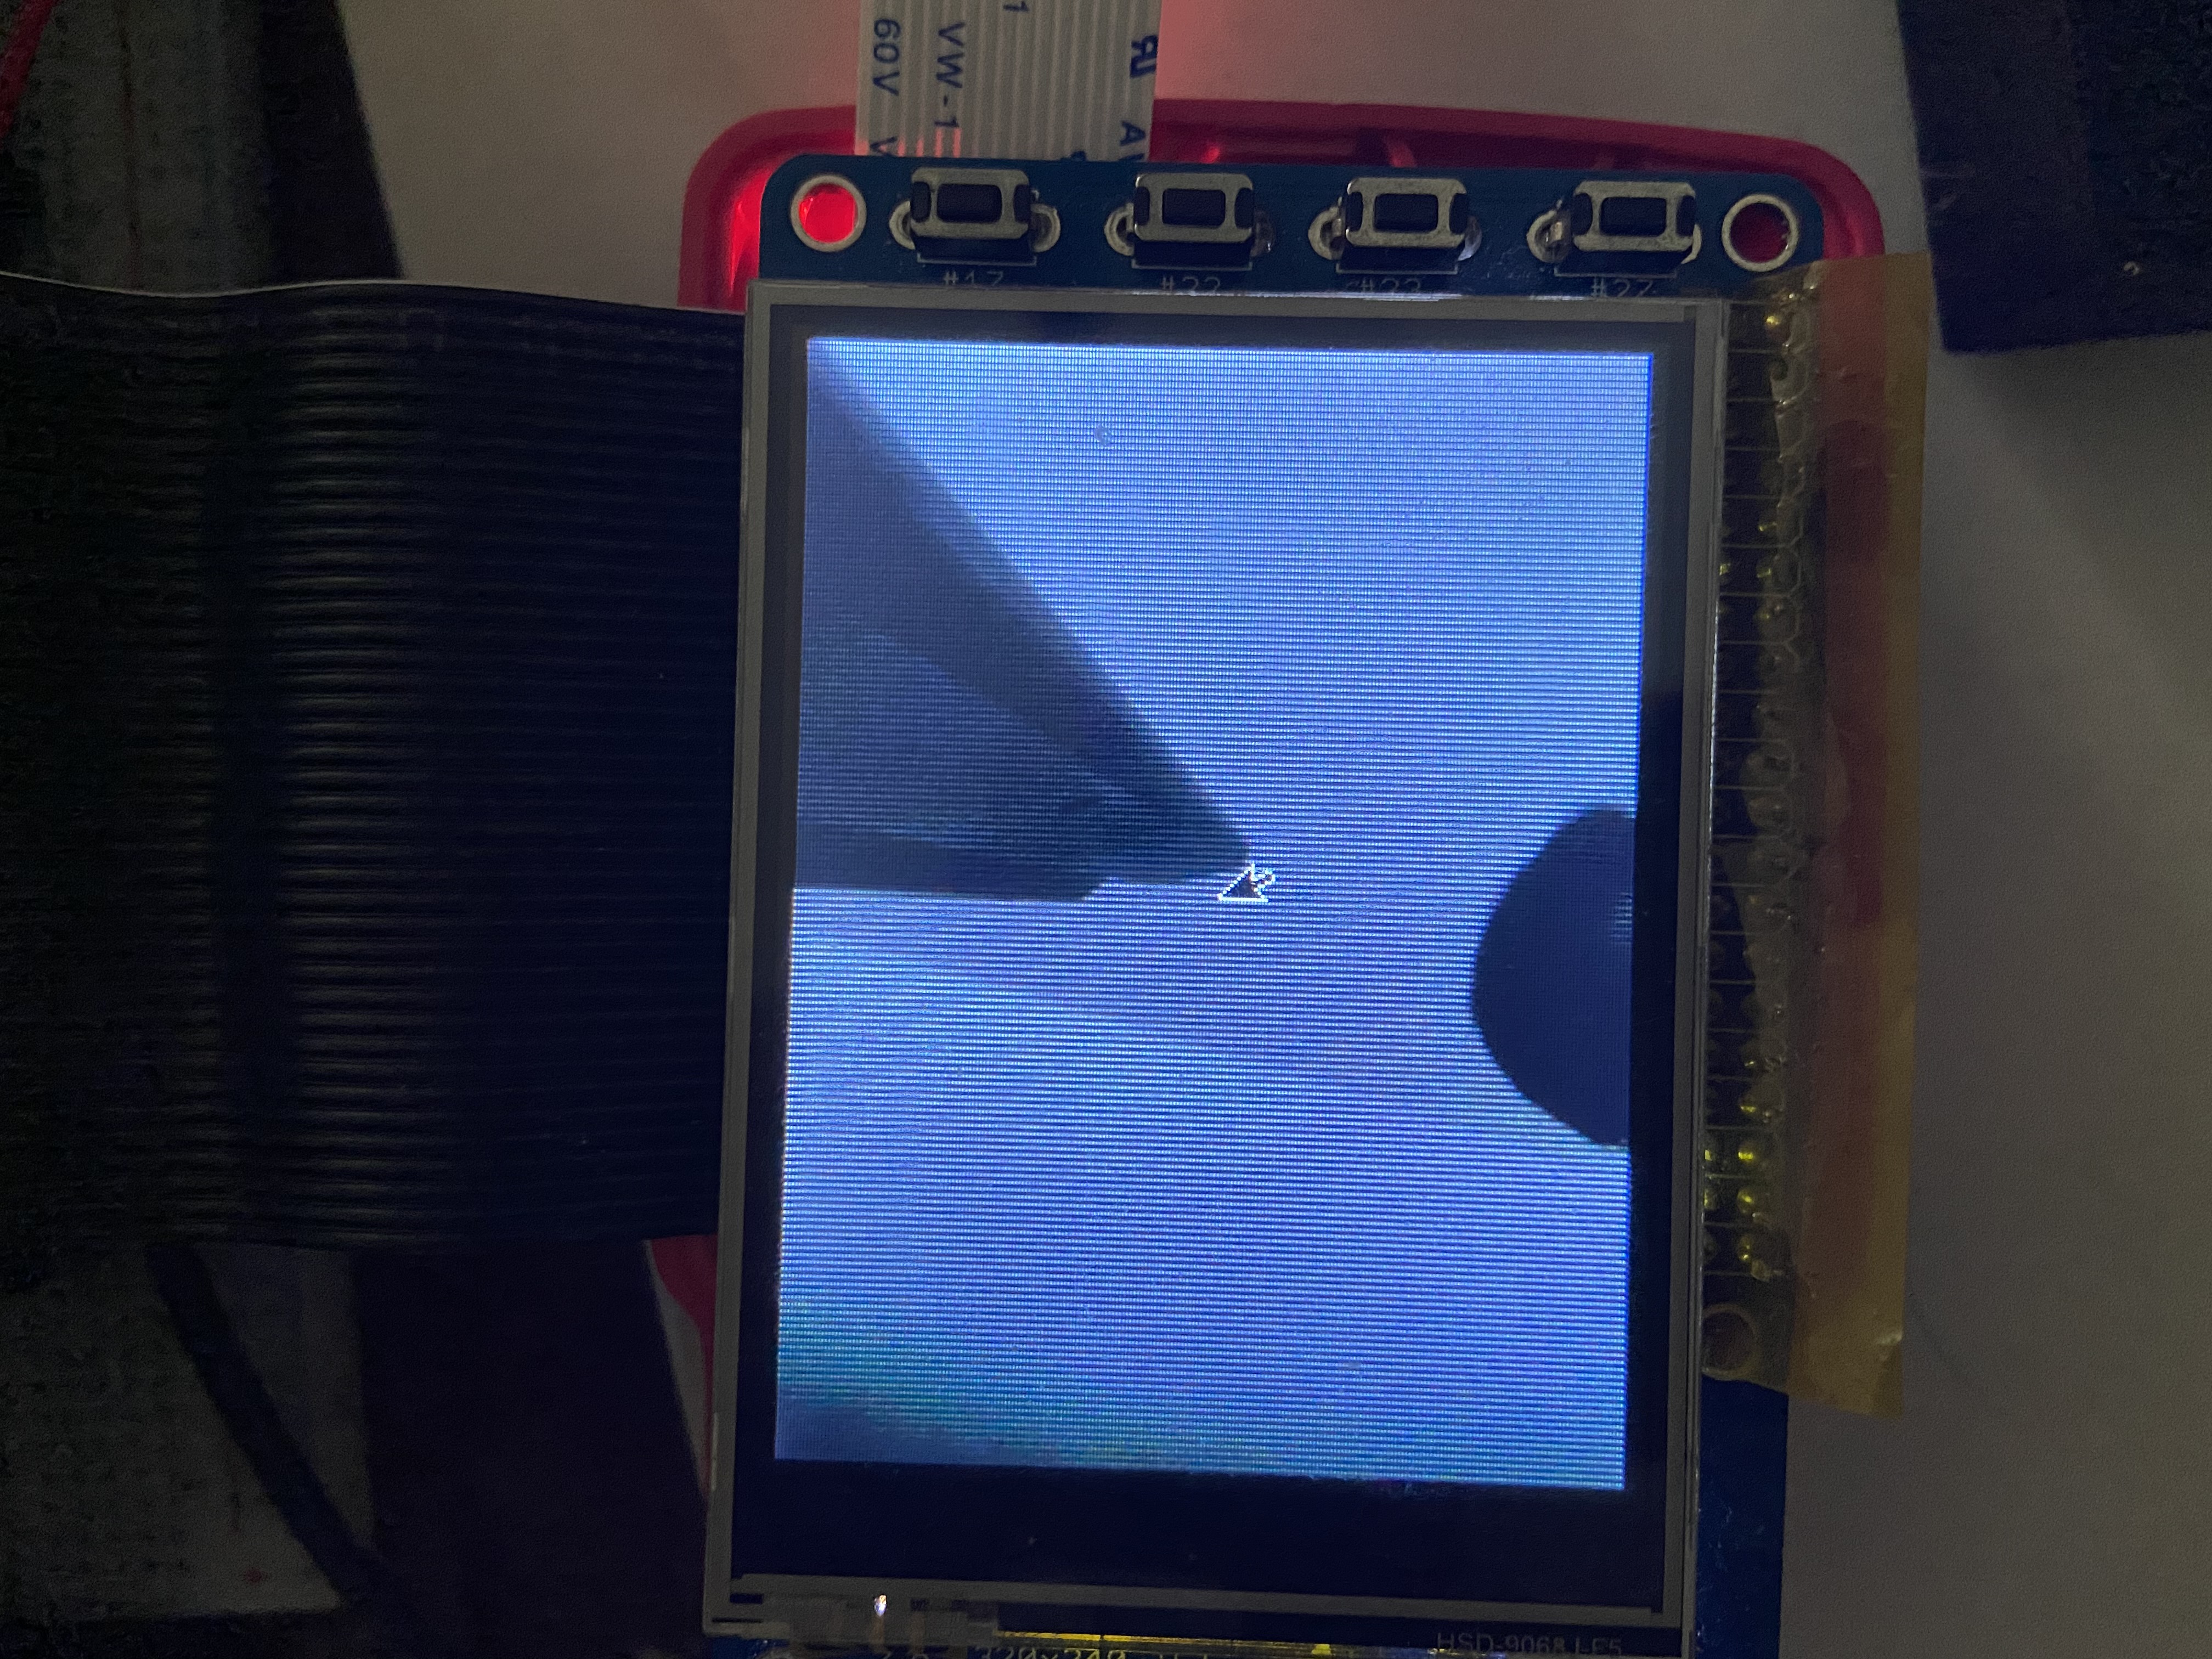
Figure 3: PiTFT testing of camera scanner code
Sensor schematic development:
Initially, we planned to use a combination of IR emitters and photodiodes to sense hand motions for play/pause control and skipping/rewinding tracks, and an ultrasonic sensor to control volume based on hand distance from the music playing unit. However, the IR emitter/photodiode pairs would have required an unnecessarily complicated hardware setup involving a tunable amplifier circuit with an op-amp and potentiometers in order to be read by the Raspberry Pi GPIO pins. At the suggestion of the professor, we elected to design our hand motion detection hardware around two emitter/receiver pairs of Adafruit break-beam sensors, which simplified this aspect of the hardware greatly and increased its reliability.
The break-beam sensors come in emitter/receiver pairs. The emitter is connected to a voltage source and grounded, and emits a constant IR beam. The receiver is an IR-sensitive device, and is also connected to the same voltage source and ground, but it includes an additional signal output. When the beam “connection” is broken by a non IR-transparent object (for example, the human hand), this signal output will drop to a logic low which can be detected by a Raspberry Pi GPIO input-configured pin.
The ultrasonic sensor estimates an object’s distance from its emitters by sending out ultrasonic sound pulses and converting the reflected sound into electrical signals. Our sensor is powered by a 5V supply from the Raspberry Pi, and grounded on the same common ground as the rest of our circuit. From a GPIO output pin, we send electrical pulse signals over the trigger pin to trigger ultrasonic emissions from the device. We read the reflected electrical signal on a GPIO input pin and determine distance from the pulse width in time of the reflected signal.
Because we chose to run both the break-beam sensors and the ultrasonic sensor off of a 5V supply from the Raspberry Pi, we needed to step the voltage outputs of these sensors down to 3.3V because this is the maximum logic voltage supported by the Raspberry Pi’s GPIO pins. We initially set up our ultrasonic sensor with a voltage divider which halved the 5V output of the sensor to a maximum of 2.5V. Our initial schematic with this implementation is shown below in Figure 4
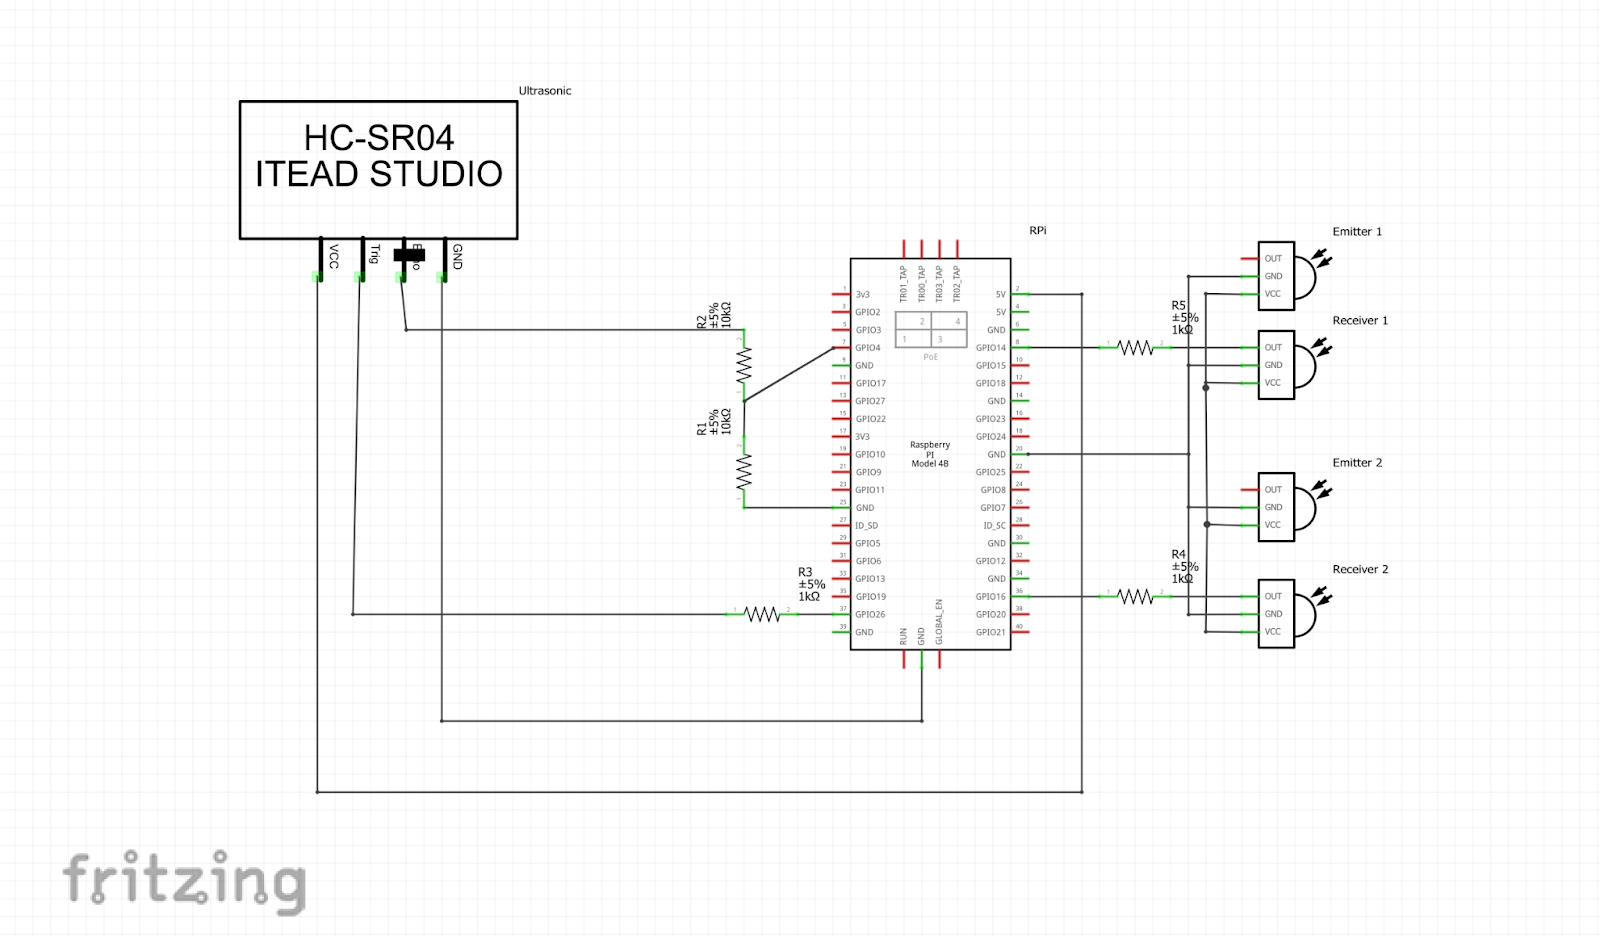
Fig: 4 First iteration of sensor hardware schematic
We believed that this would work as intended because the Raspberry Pi’s logic level threshold is 1.8V, but in our initial tests of the ultrasonic sensor we were not receiving reliable distance readings (which would have translated to spotty volume control). One possible solution would have been to implement voltage dividers that resulted in a 3.3V output, but this would require many resistors and an overly complicated breadboarding process, since we also needed to step down the logic signals from both break-beam receivers. Since all of these signals were digital (hence being read by Raspberry Pi GPIO pins), we did not need to preserve any analog components of the signals, and could implement a simpler logic voltage translation using a 5V to 3.3V level shifter from Sparkfun. This level shifter operates based on two “high” and “low” reference voltages (in our case, 5V and 3.3V respectively, both of which were provided by the Raspberry Pi), and translates up to 4 “high” voltage inputs down to “low” voltages via a network of MOSFETs. We sent both of the break-beam receiver signals through this level shifter, as well as the echo pin of the ultrasonic sensor. At the low side of the level shifter, each of the outputs is sent to a GPIO input-configured pin, with a 1k resistor included as well for current protection. The final schematic can be seen in Figure 5, and the Fritzing project files can be downloaded here.
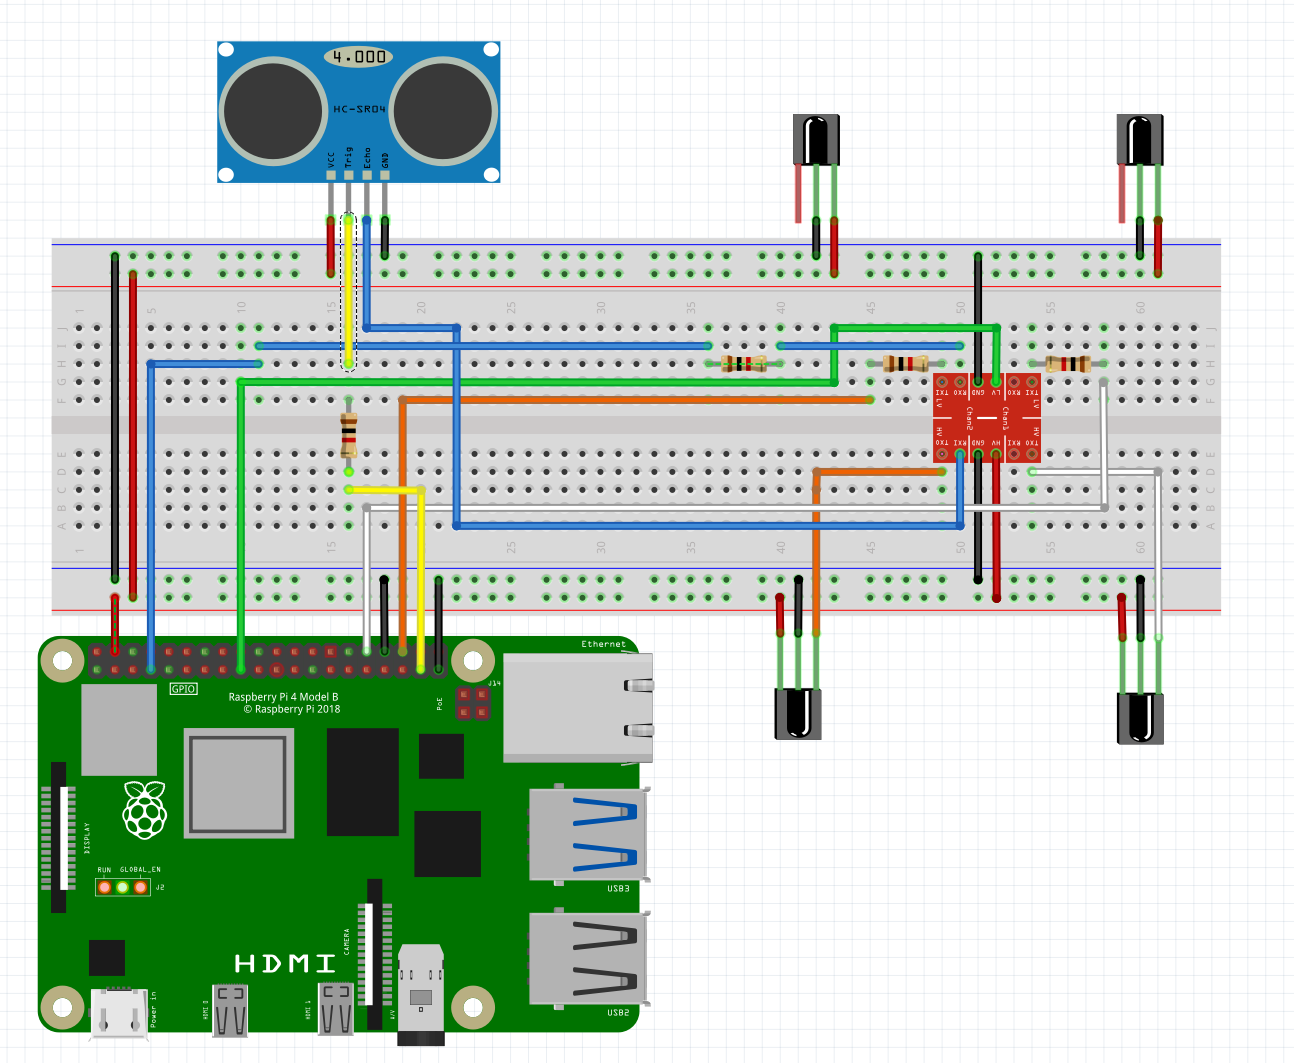
Figure 5: Final sensor hardware schematic
Sensor Testing:
We tested basic functionality of the break-beam sensors by connecting them as shown/described in the schematic section above, with the receiver output signals connected to GPIO input pins. To observe that they were functioning properly, we ran PiScope as we were instructed to in previous labs in the course. By observing the signals on the two GPIO pins that were connected to receiver outputs, we were able to see that the signals went to logic low when the beam “connections” were broken between sensor pairs, and showed logic high otherwise. These results are shown in the PiScope screenshots below in Figure 6.
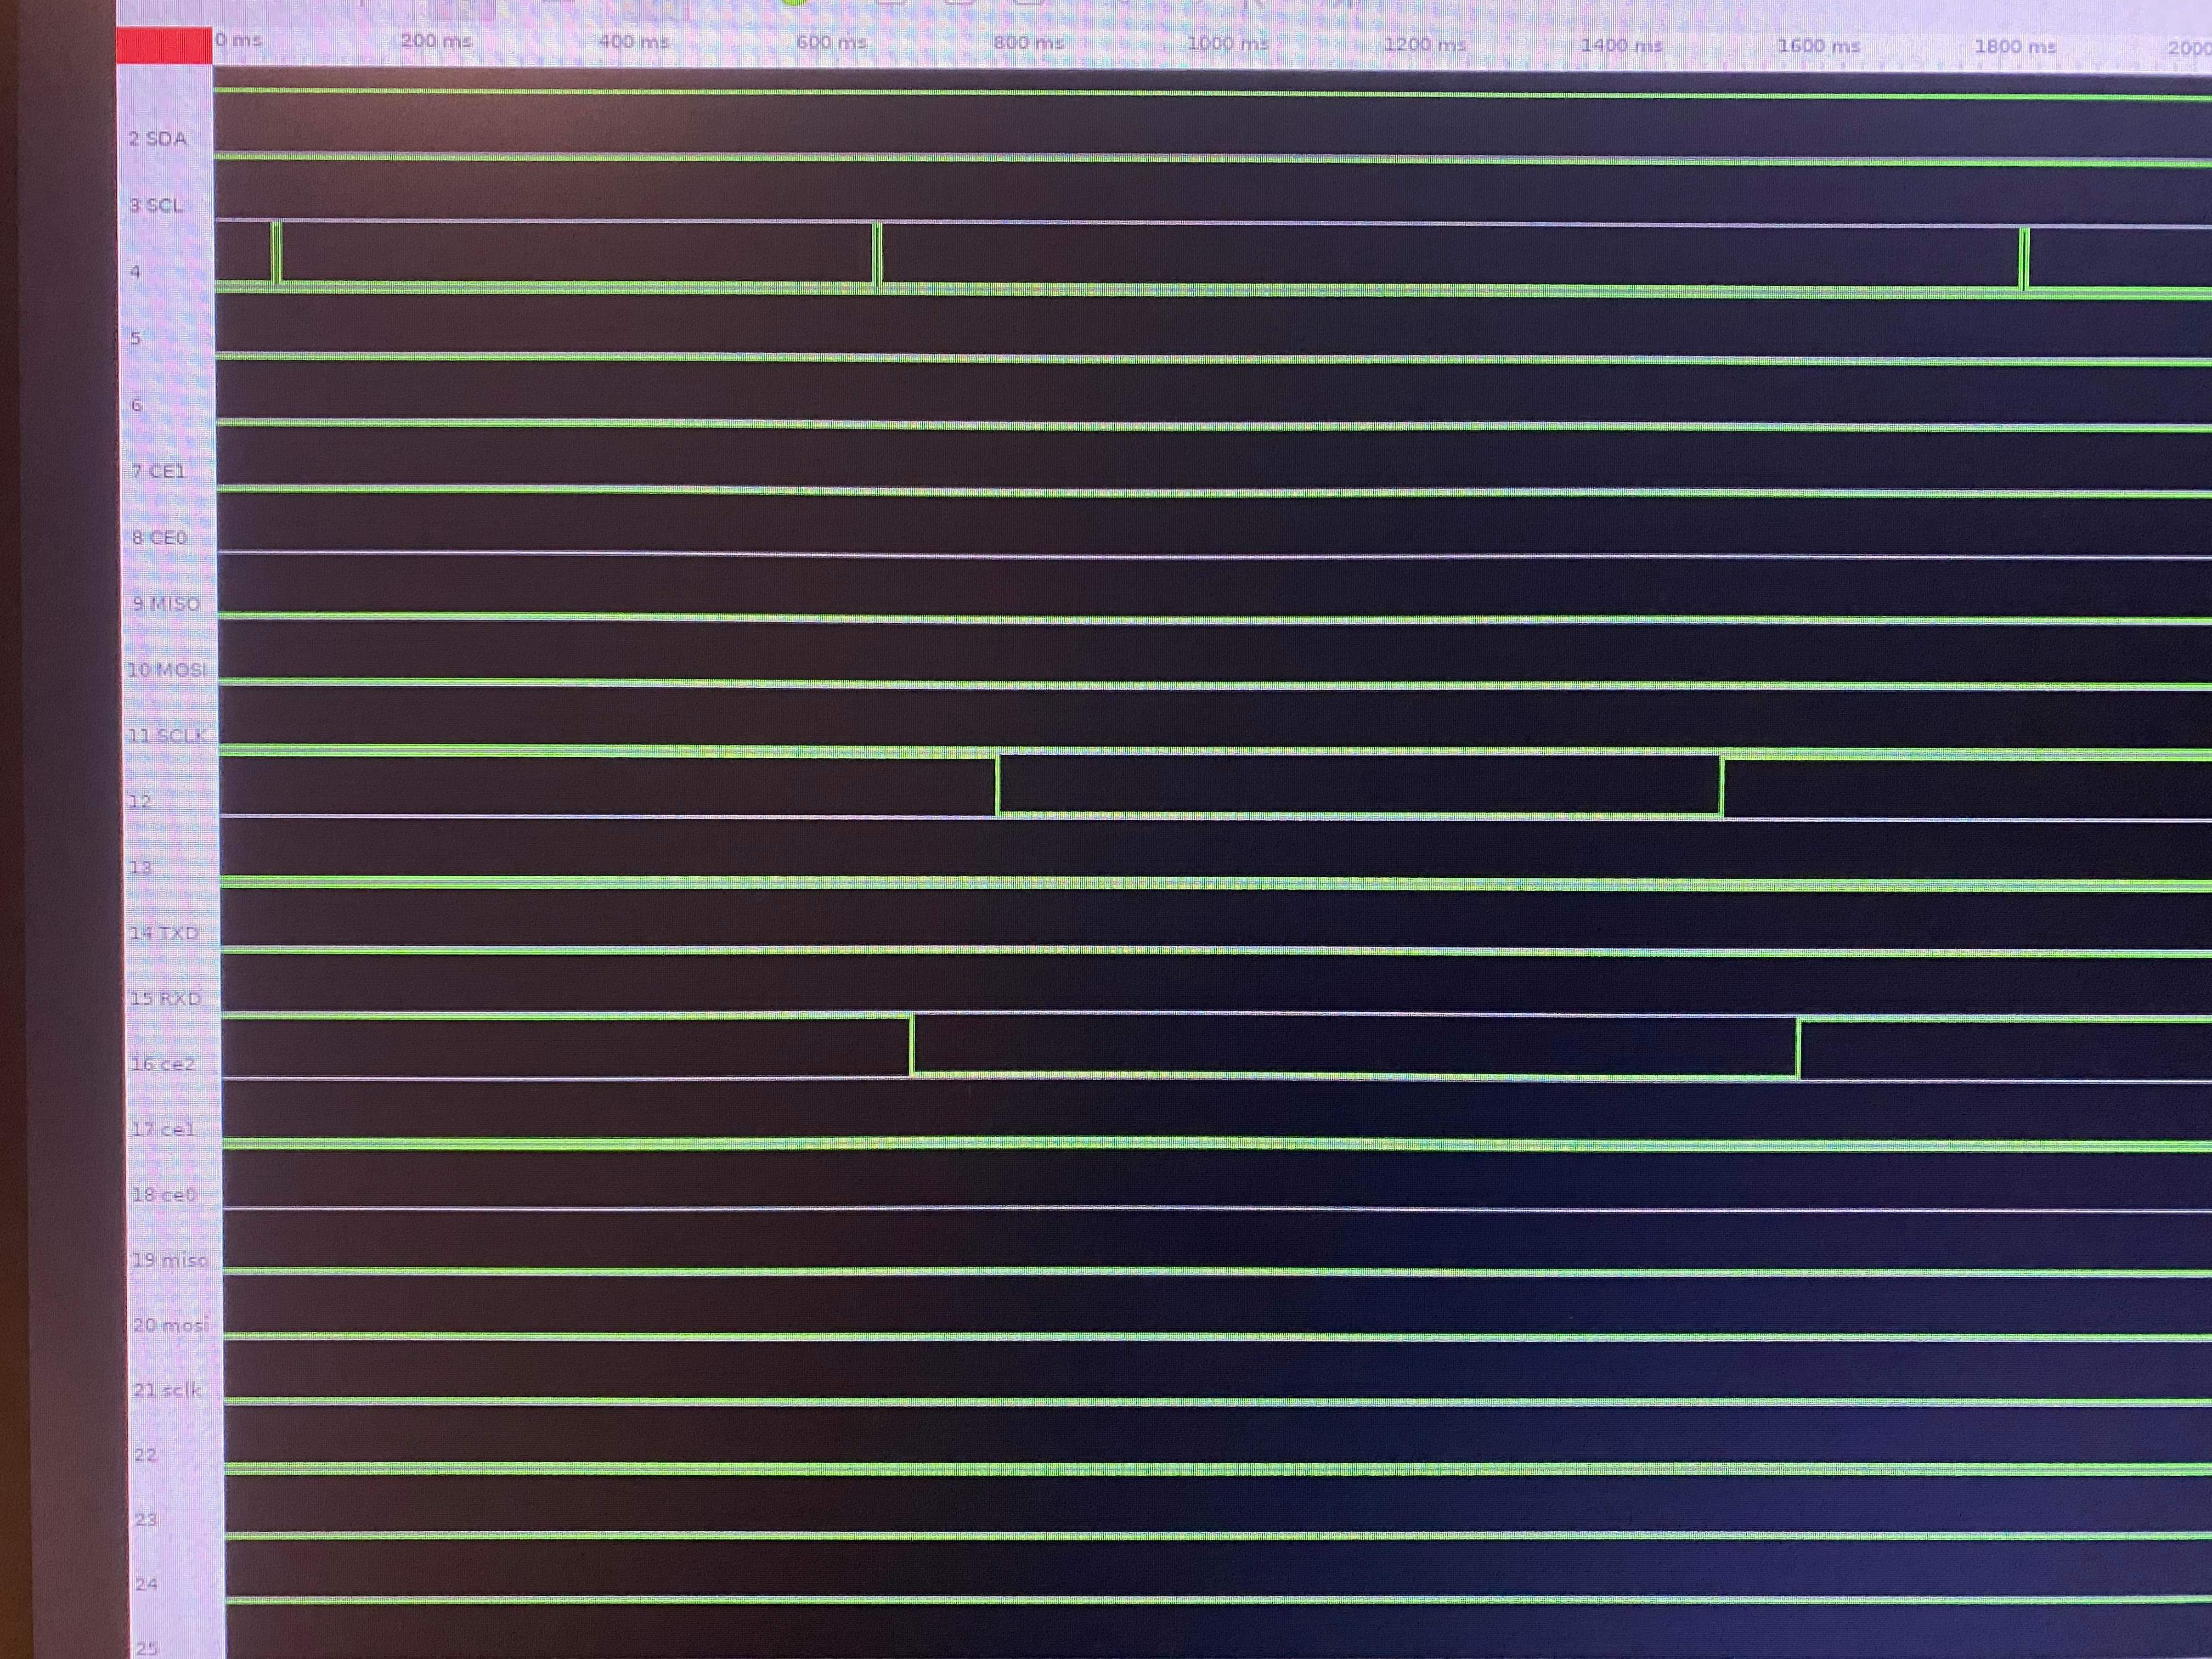
Figure 6: PiScope testing of break-beam sensors
We tested basic distance reading functionality of the ultrasonic sensor by writing a short script called distance.py. This script calculates the distance by sending a trigger pulse and the received pulse’s width in time on the echo line. We begin by setting the trigger GPIO output to low for 0.5 seconds to allow the sensor to settle from the last reflected pulse. We then send a pulse out on the trigger pin by setting the GPIO output to high for 0.00001 seconds. Finally, we take a timestamp at the beginning and end of the echo pulse, based on the times that the GPIO input reads logic 0 and 1. Finally, we convert this pulse width to a distance in centimeters using a conversion factor found from the Adafruit site. As can be seen in Figure 8 below, we were able to get fairly accurate readings of around 10cm, with about 8% error from the expected value of 10 that we measured with a tape measure.
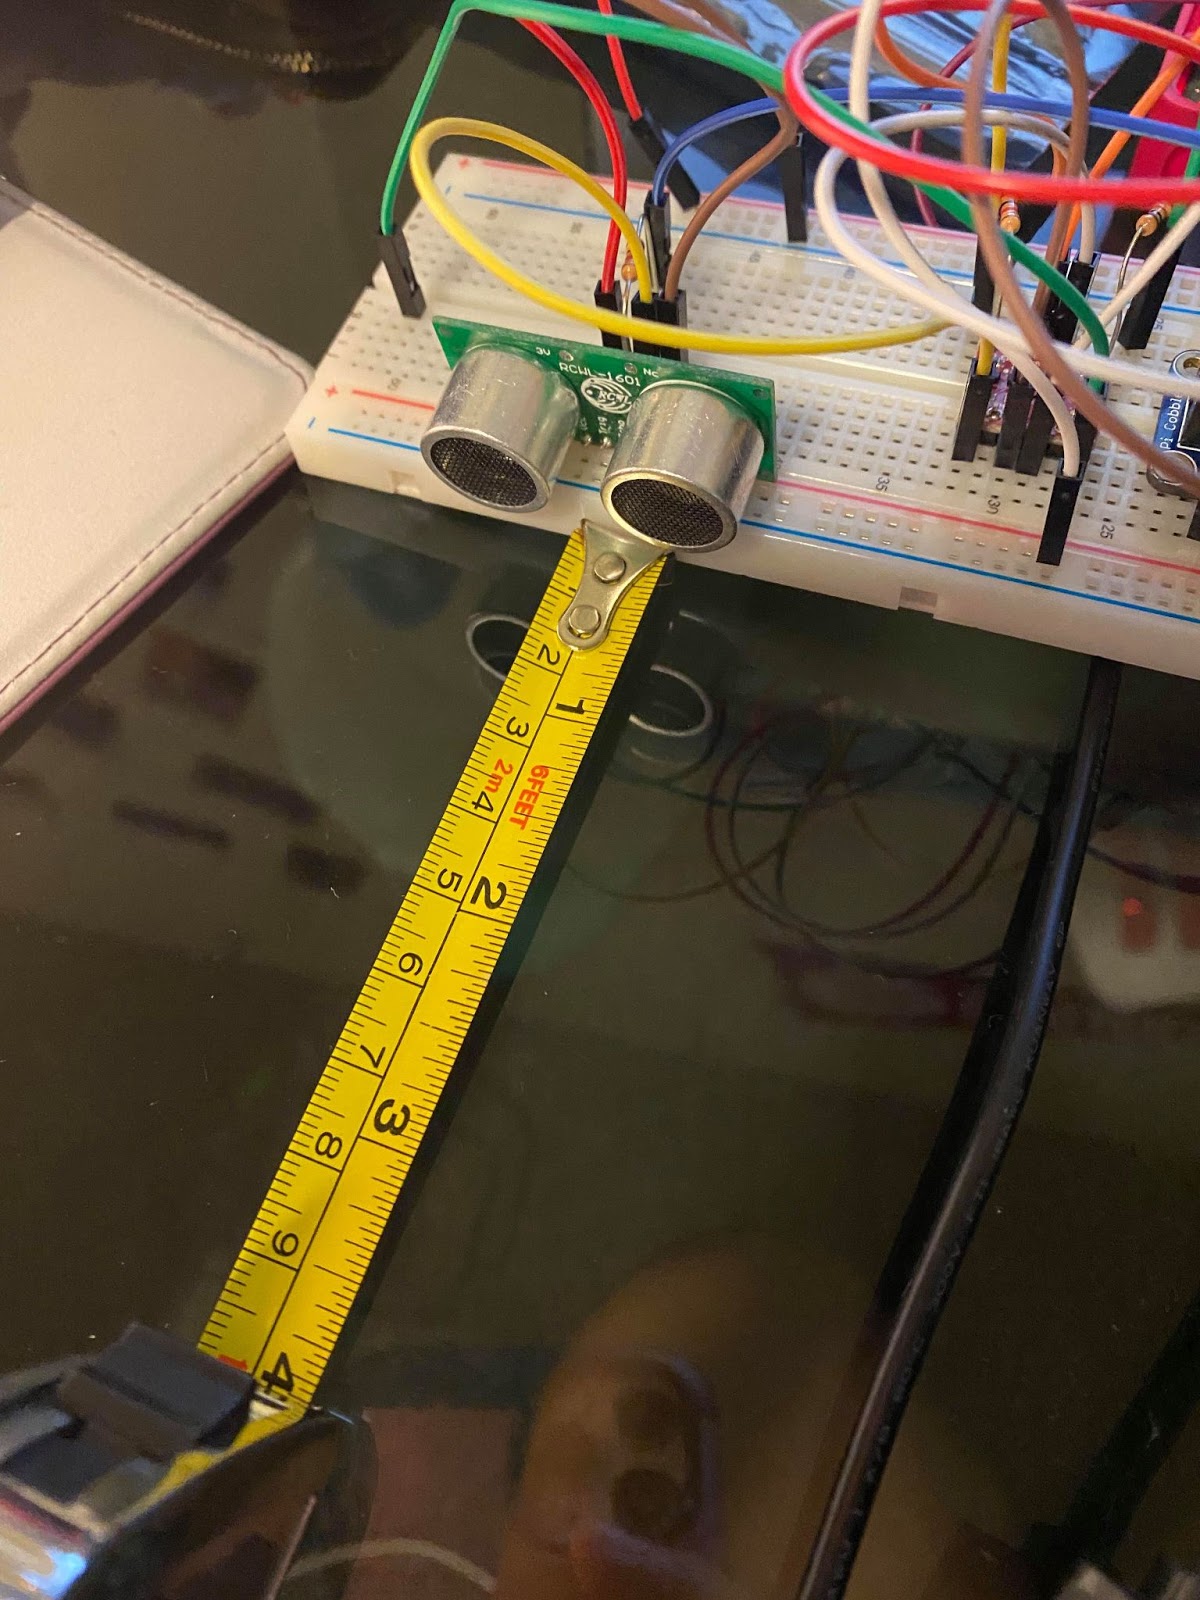
Figure 7: Ultrasonic sensor testing with ‘distance.py’
Music playback: OMXPlayer:
We chose to create an internal song library in our project which is stored locally on the Raspberry Pi. We downloaded mp3 files to put in our library using a YouTube to mp3 conversion site. Initially we wanted to use mplayer to play the music, however when we played music on mplayer opened on a subprocess, it was not responding to the commands that we were sending through subprocess input. After searching we found one project using OMXPlayer for playing music and when we tried OMXPlayer, it was responsive to the commands sent [2]. Thus we decided to use OMXPlayer for the project. The list below describes the OMXPlayer commands that we used in our project to control song playback.
command Function
q exit omxplayer/stop the music playing
p pause/play music
+ Increase volume
- decrease volume
Software integration: sensor code for music control:
sensor.py to control music playback. We have a folder called song_library in our project that contains the local song library of all the songs that we downloaded from YouTube, which the users can then select from to make their playlist. We used the glob library from Python to keep the list of all the paths of the songs from the song_library folder in sensor.py. A pointer was used to iterate through the list of the songs in the local library. The songs were played by opening OMXPlayer through a subprocess (just as we did with mplayer in our labs) using the pointer to choose a specific song from the song list, and sending commands to the player through subprocess stdin.
To read from all of the sensors and handle appropriate song playback control, we placed a series of if-else statements inside of a while loop to continuously poll the sensors while leaving room to integrate easily with a Pygame GUI later in the design process.
We positioned two emitters and receivers in such a way so that each receiver can receive the signal from a corresponding emitter without interference from one another. The functionalities are described below:
i) Play/Pause: Both receivers blocked by hands
ii) Next song: Right receiver blocked
iii) Previous song: Left receiver blocked
Since the emitter and receiver are facing each other, the receiver continuously receives a high signal until the emitter is blocked. Thus we used if else statements to check if GPIO pins connected to receivers are receiving 0 and take appropriate action based on which combinations of receivers are blocked. If the GPIO pin connected to the right receiver gets a ‘0’, the program sends a ‘q’ input signal to the OMXPlayer which stops the player. Next the pointer is incremented by 1 and the player is started again with the next song from the list. Similarly, if the GPIO pin connected to the left receiver gets a ‘0’, the pointer is decremented and the previous song is selected by quitting and restarting OMXPlayer. We also handle the edge cases when the pointer reaches the end of the list and the beginning of the list by rolling over the pointer to keep it from getting out of range.
In order to control volume, we used the function from the ‘distance.py’ testing script to get a distance in centimeters of the user’s hand from the ultrasonic sensor’s base. We called this function after checking both break-beam sensors in the if statements described above, to get the distance of the user’s hand from the sensor. Then, we included an if statement to check if the recorded distance was between 1 and 10 centimeters (so that the sensor doesn’t trigger volume changes from a user’s unintentional motions) and if this was the case we compared it to the current volume and iterated through a for loop to increment or decrement the volume in both our code counter and omxplayer (using the ‘+’ command) until it reached the same number as the distance sensor reading.
Software integration: Pygame GUI:
In order to make device usage clear and concise to our users, we created a Pygame GUI framework. The first screen in the GUI is the start screen, which has two buttons: ‘Start’ and ‘Quit.’ The ‘Start’ button takes the users to the next screen and the ‘Quit’ button ends the program. We also had a welcome message in the start screen. Below is a picture of the start screen
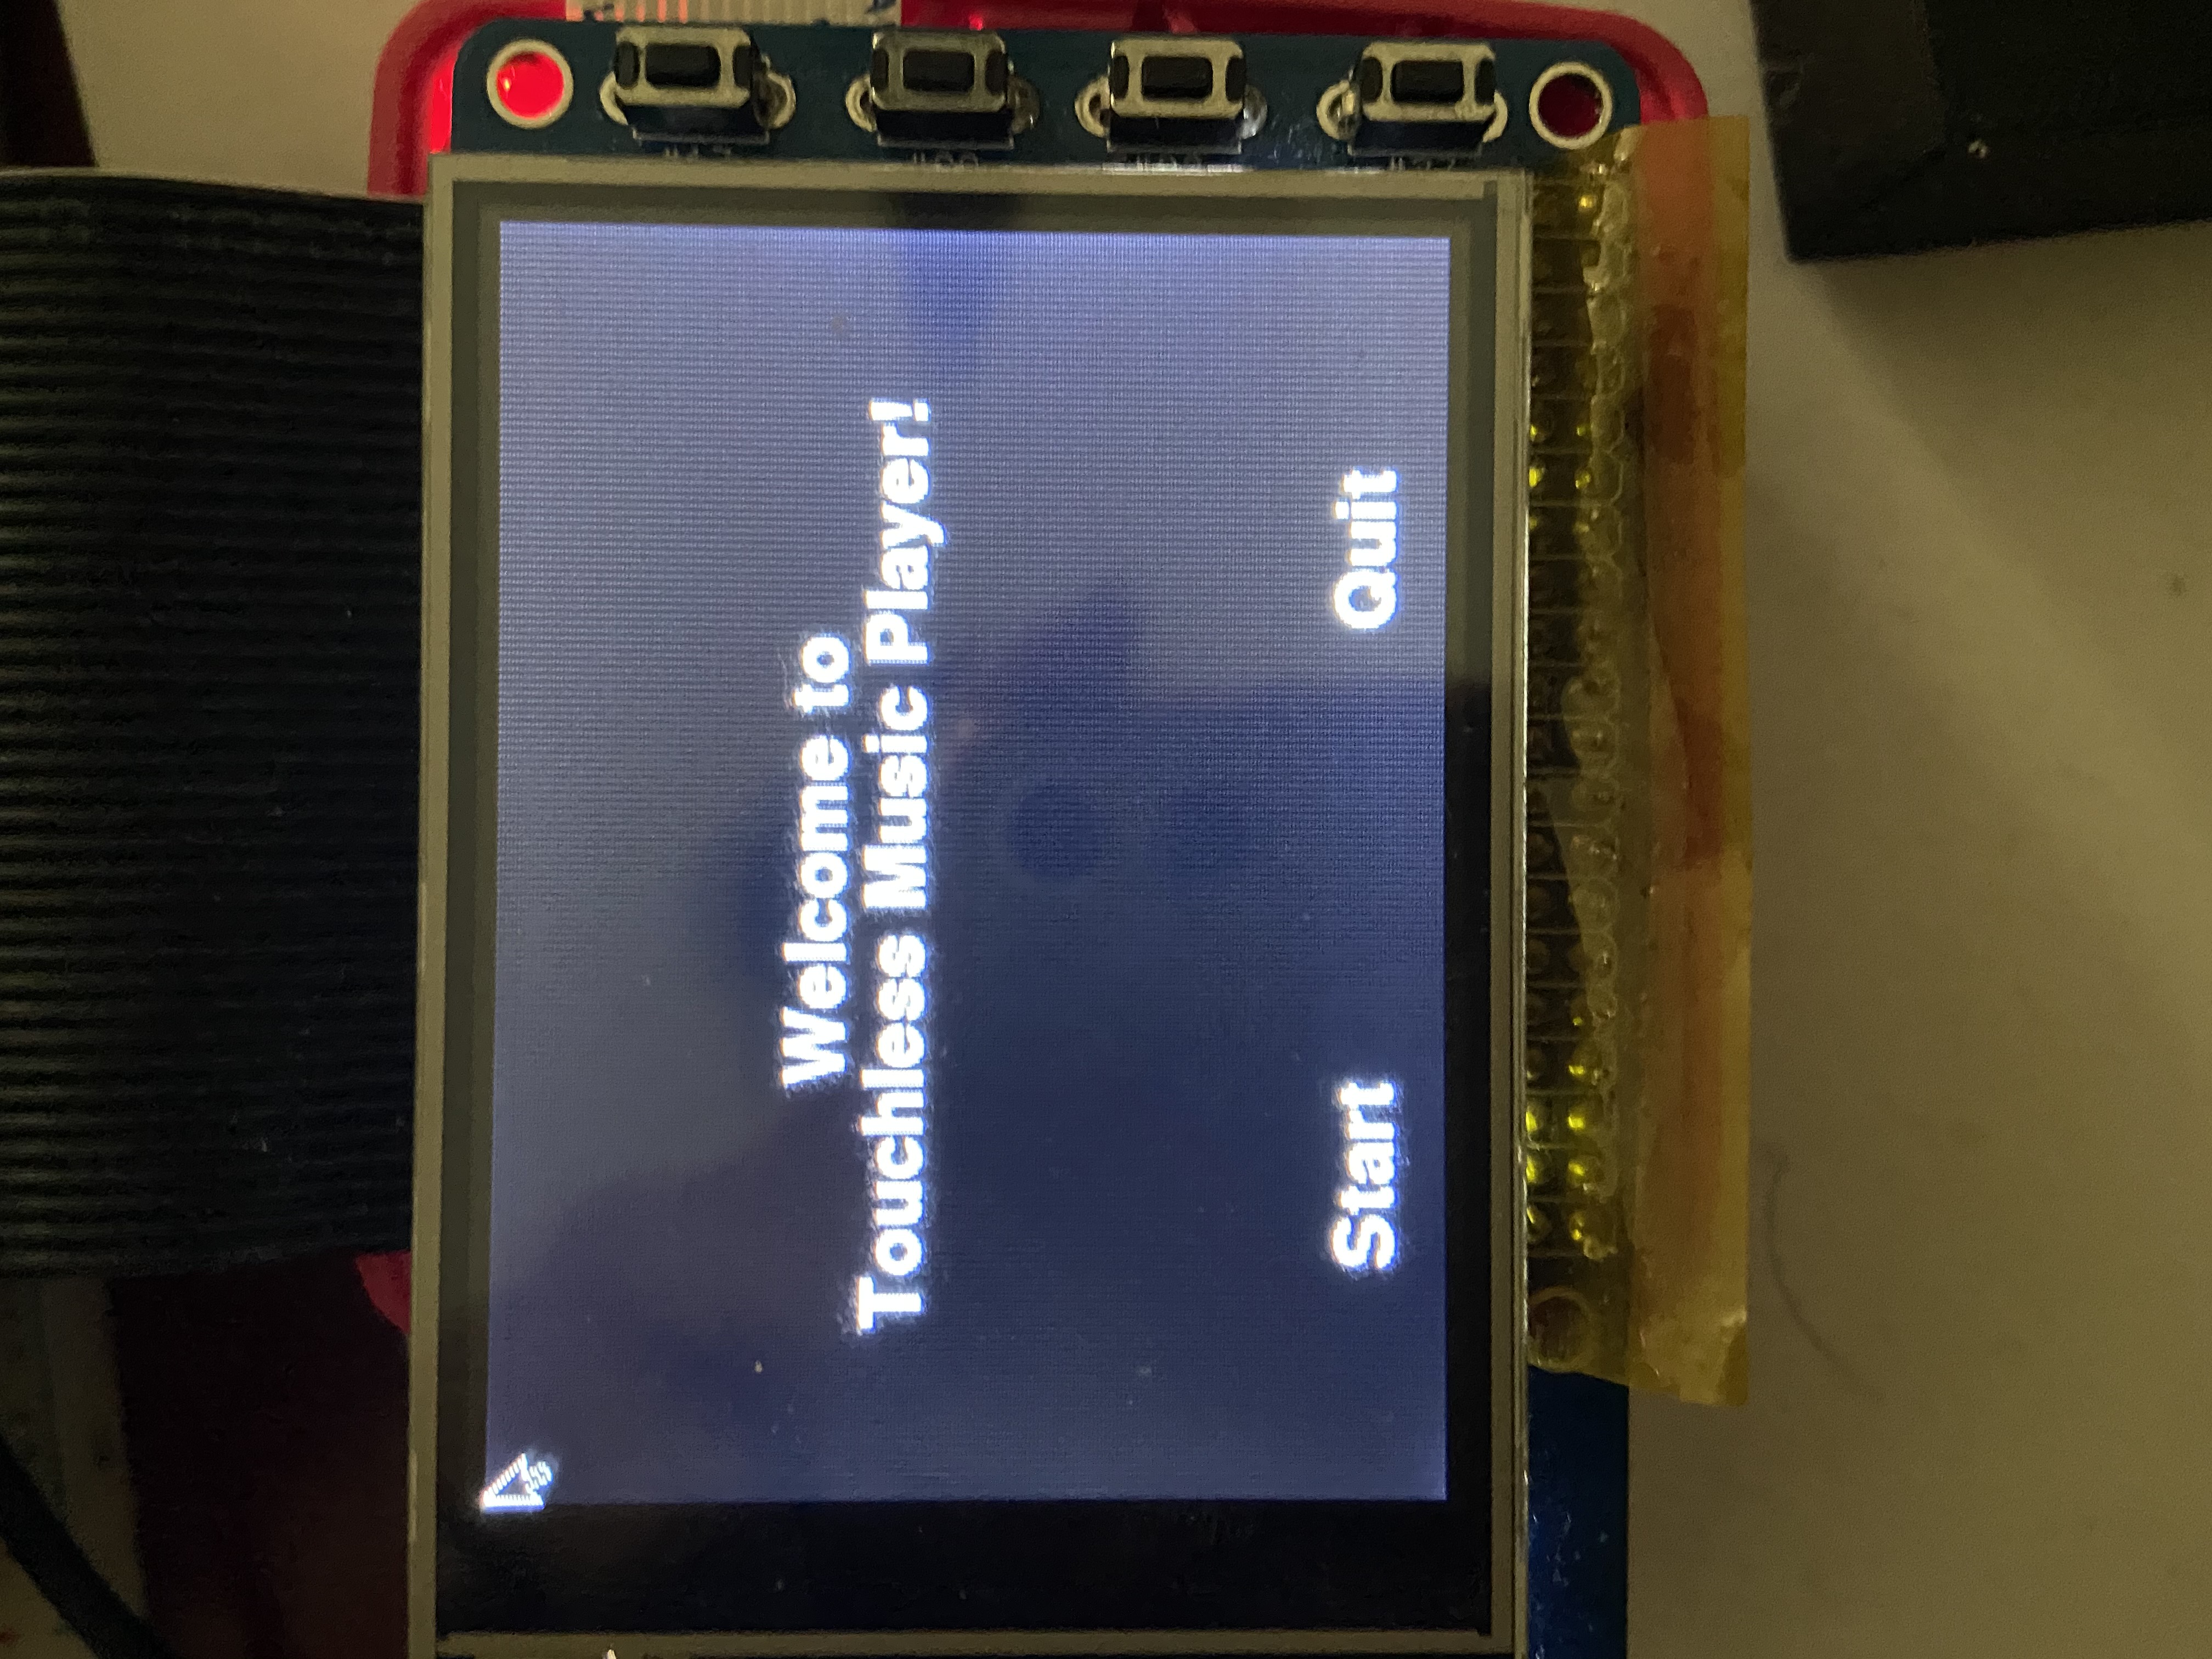
Figure 8: Start screen in Pygame GUI
The next two screens are the instruction screens that instruct the user to 1) scan their QR code to load their personal playlist, and 2) describe how the touchless control sensors work. The first instruction screen contains the same ‘Quit’ button as the start screen, as well as a ‘Next’ button to proceed to the next instruction page. In addition, this screen also has a new user button which a new user needs to press to get their QR code and make their playlist. Pre-existing users can press the next button twice to proceed through the sensor control instructions to the scan screen.
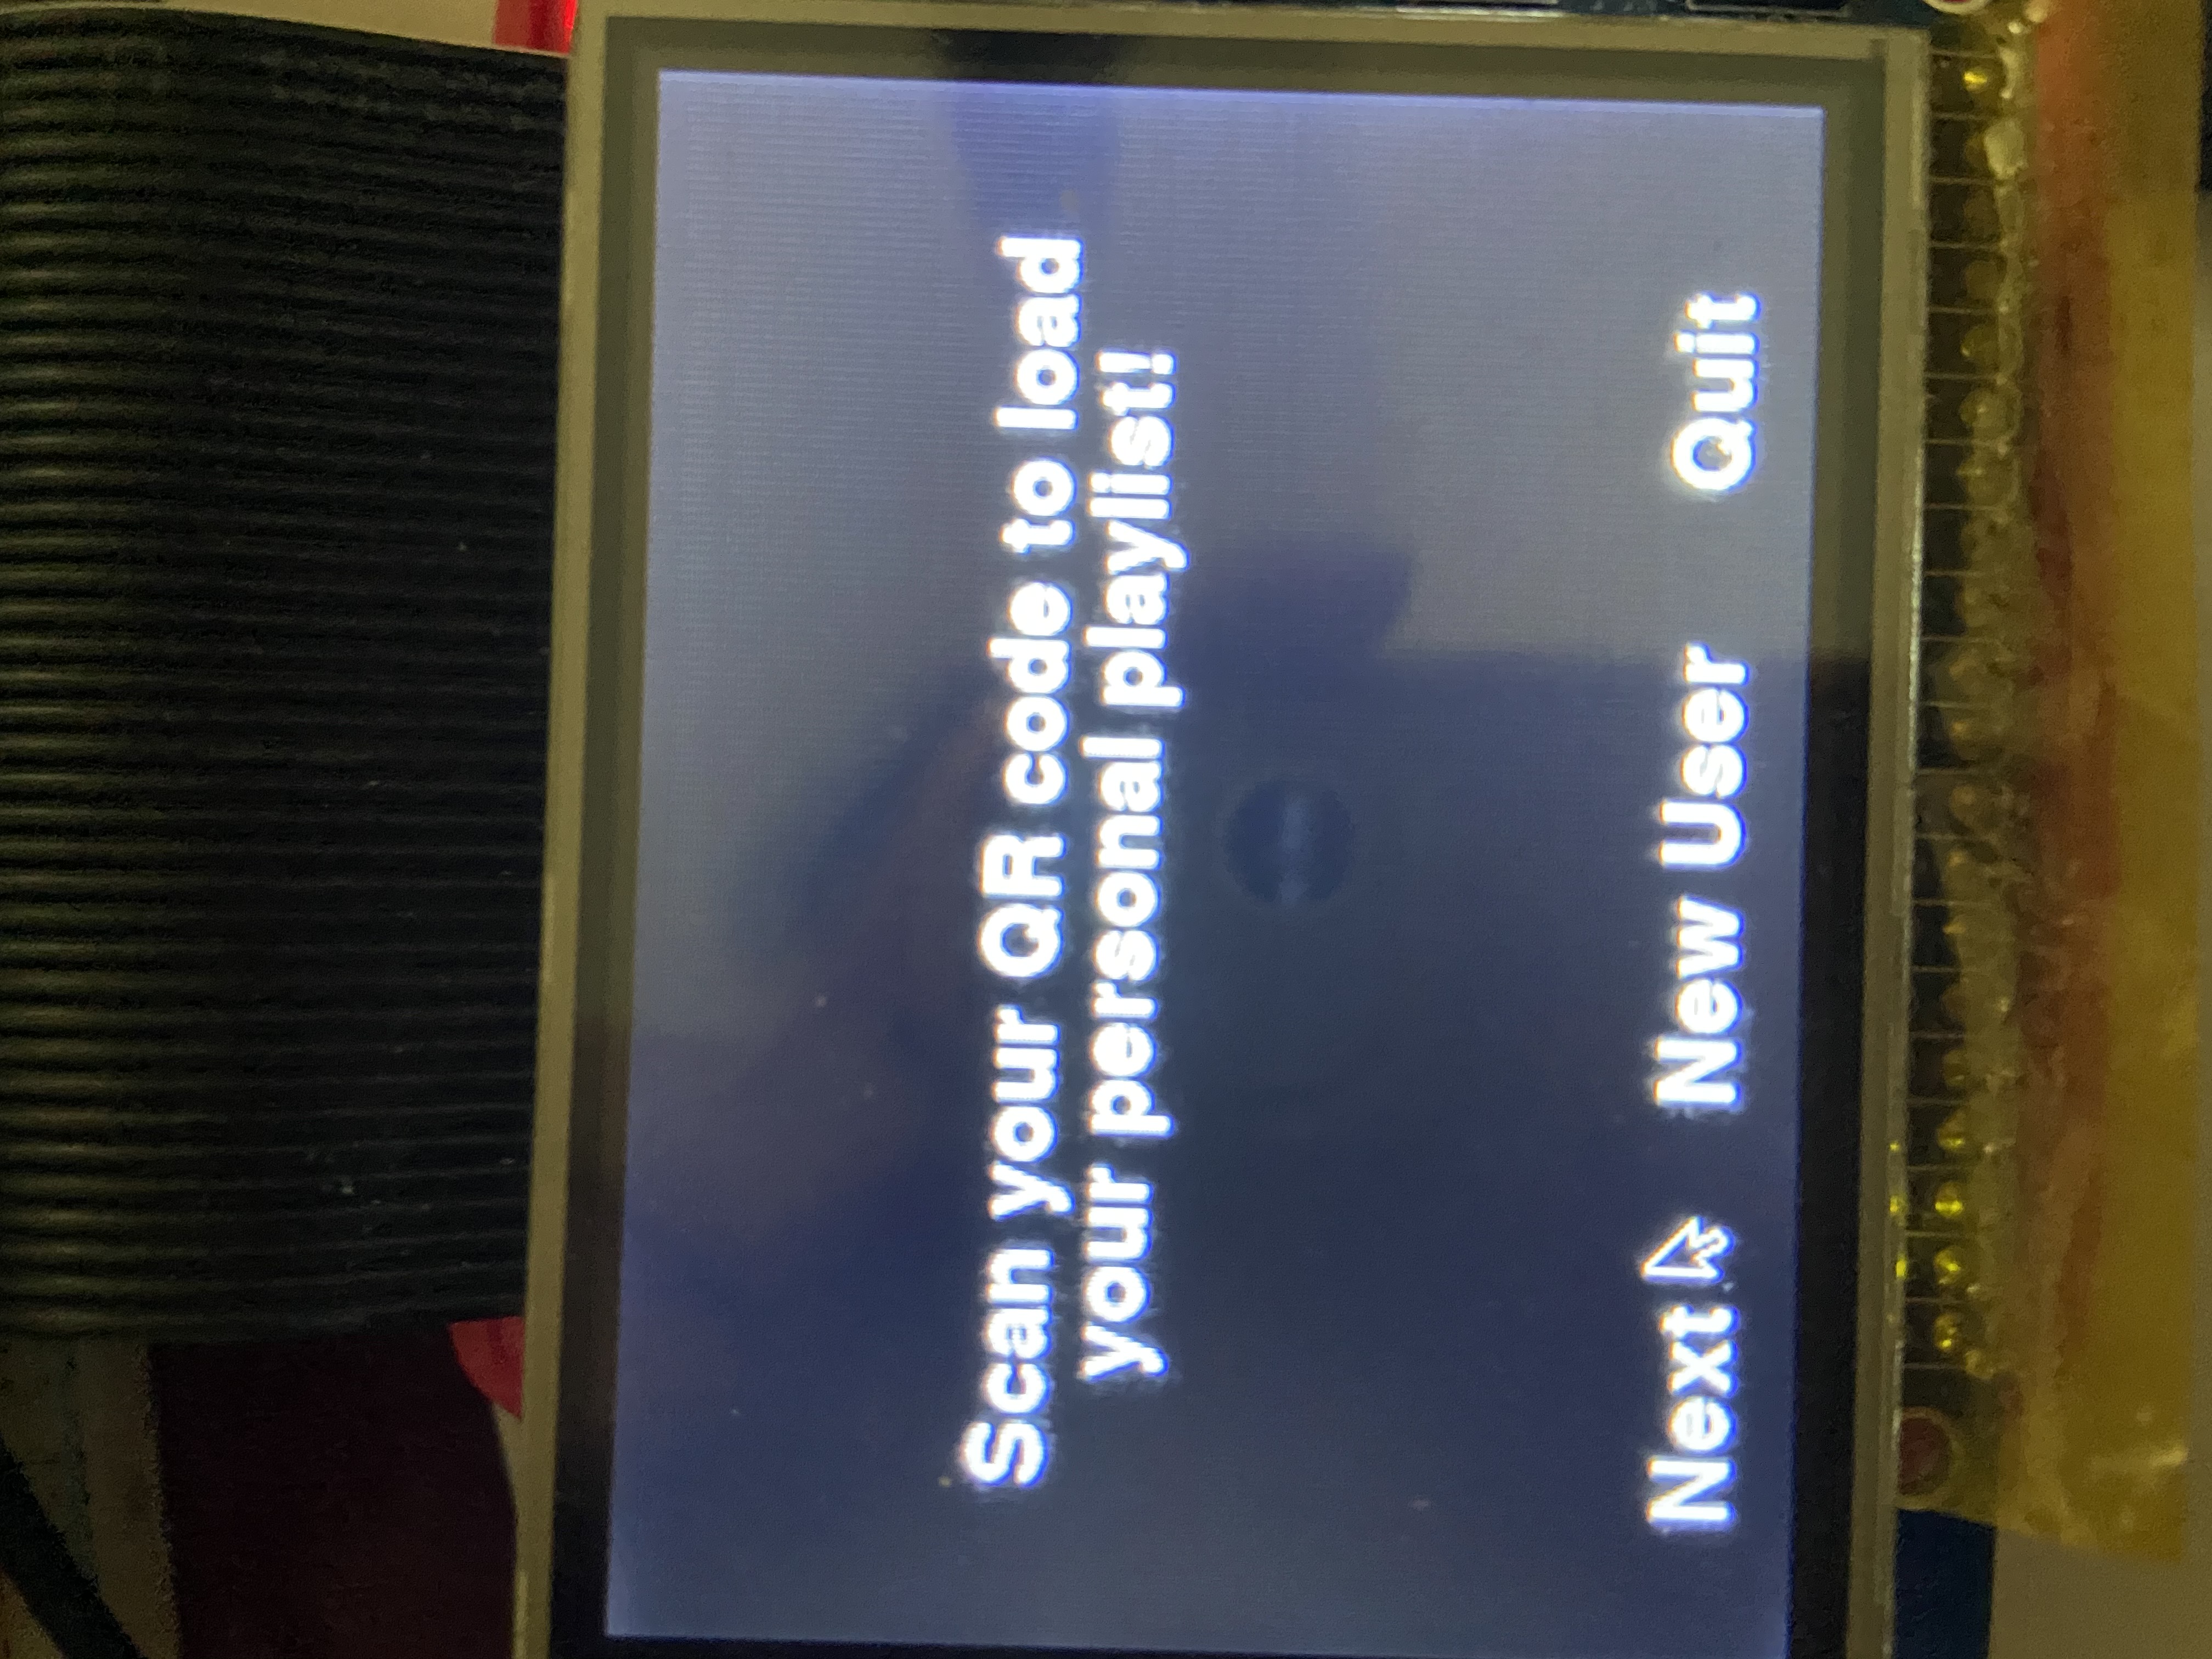
Figure 9: First instruction screen in Pygame GUI
If a new user wants to create a custom playlist, they must click on the new user button on the instruction screen which will generate a new user id, QR code, and a playlist folder for the user. The user id is saved in the ‘netid.txt’ file to be used later in scanning. The user is also instructed to take a picture of their QR code for future use.
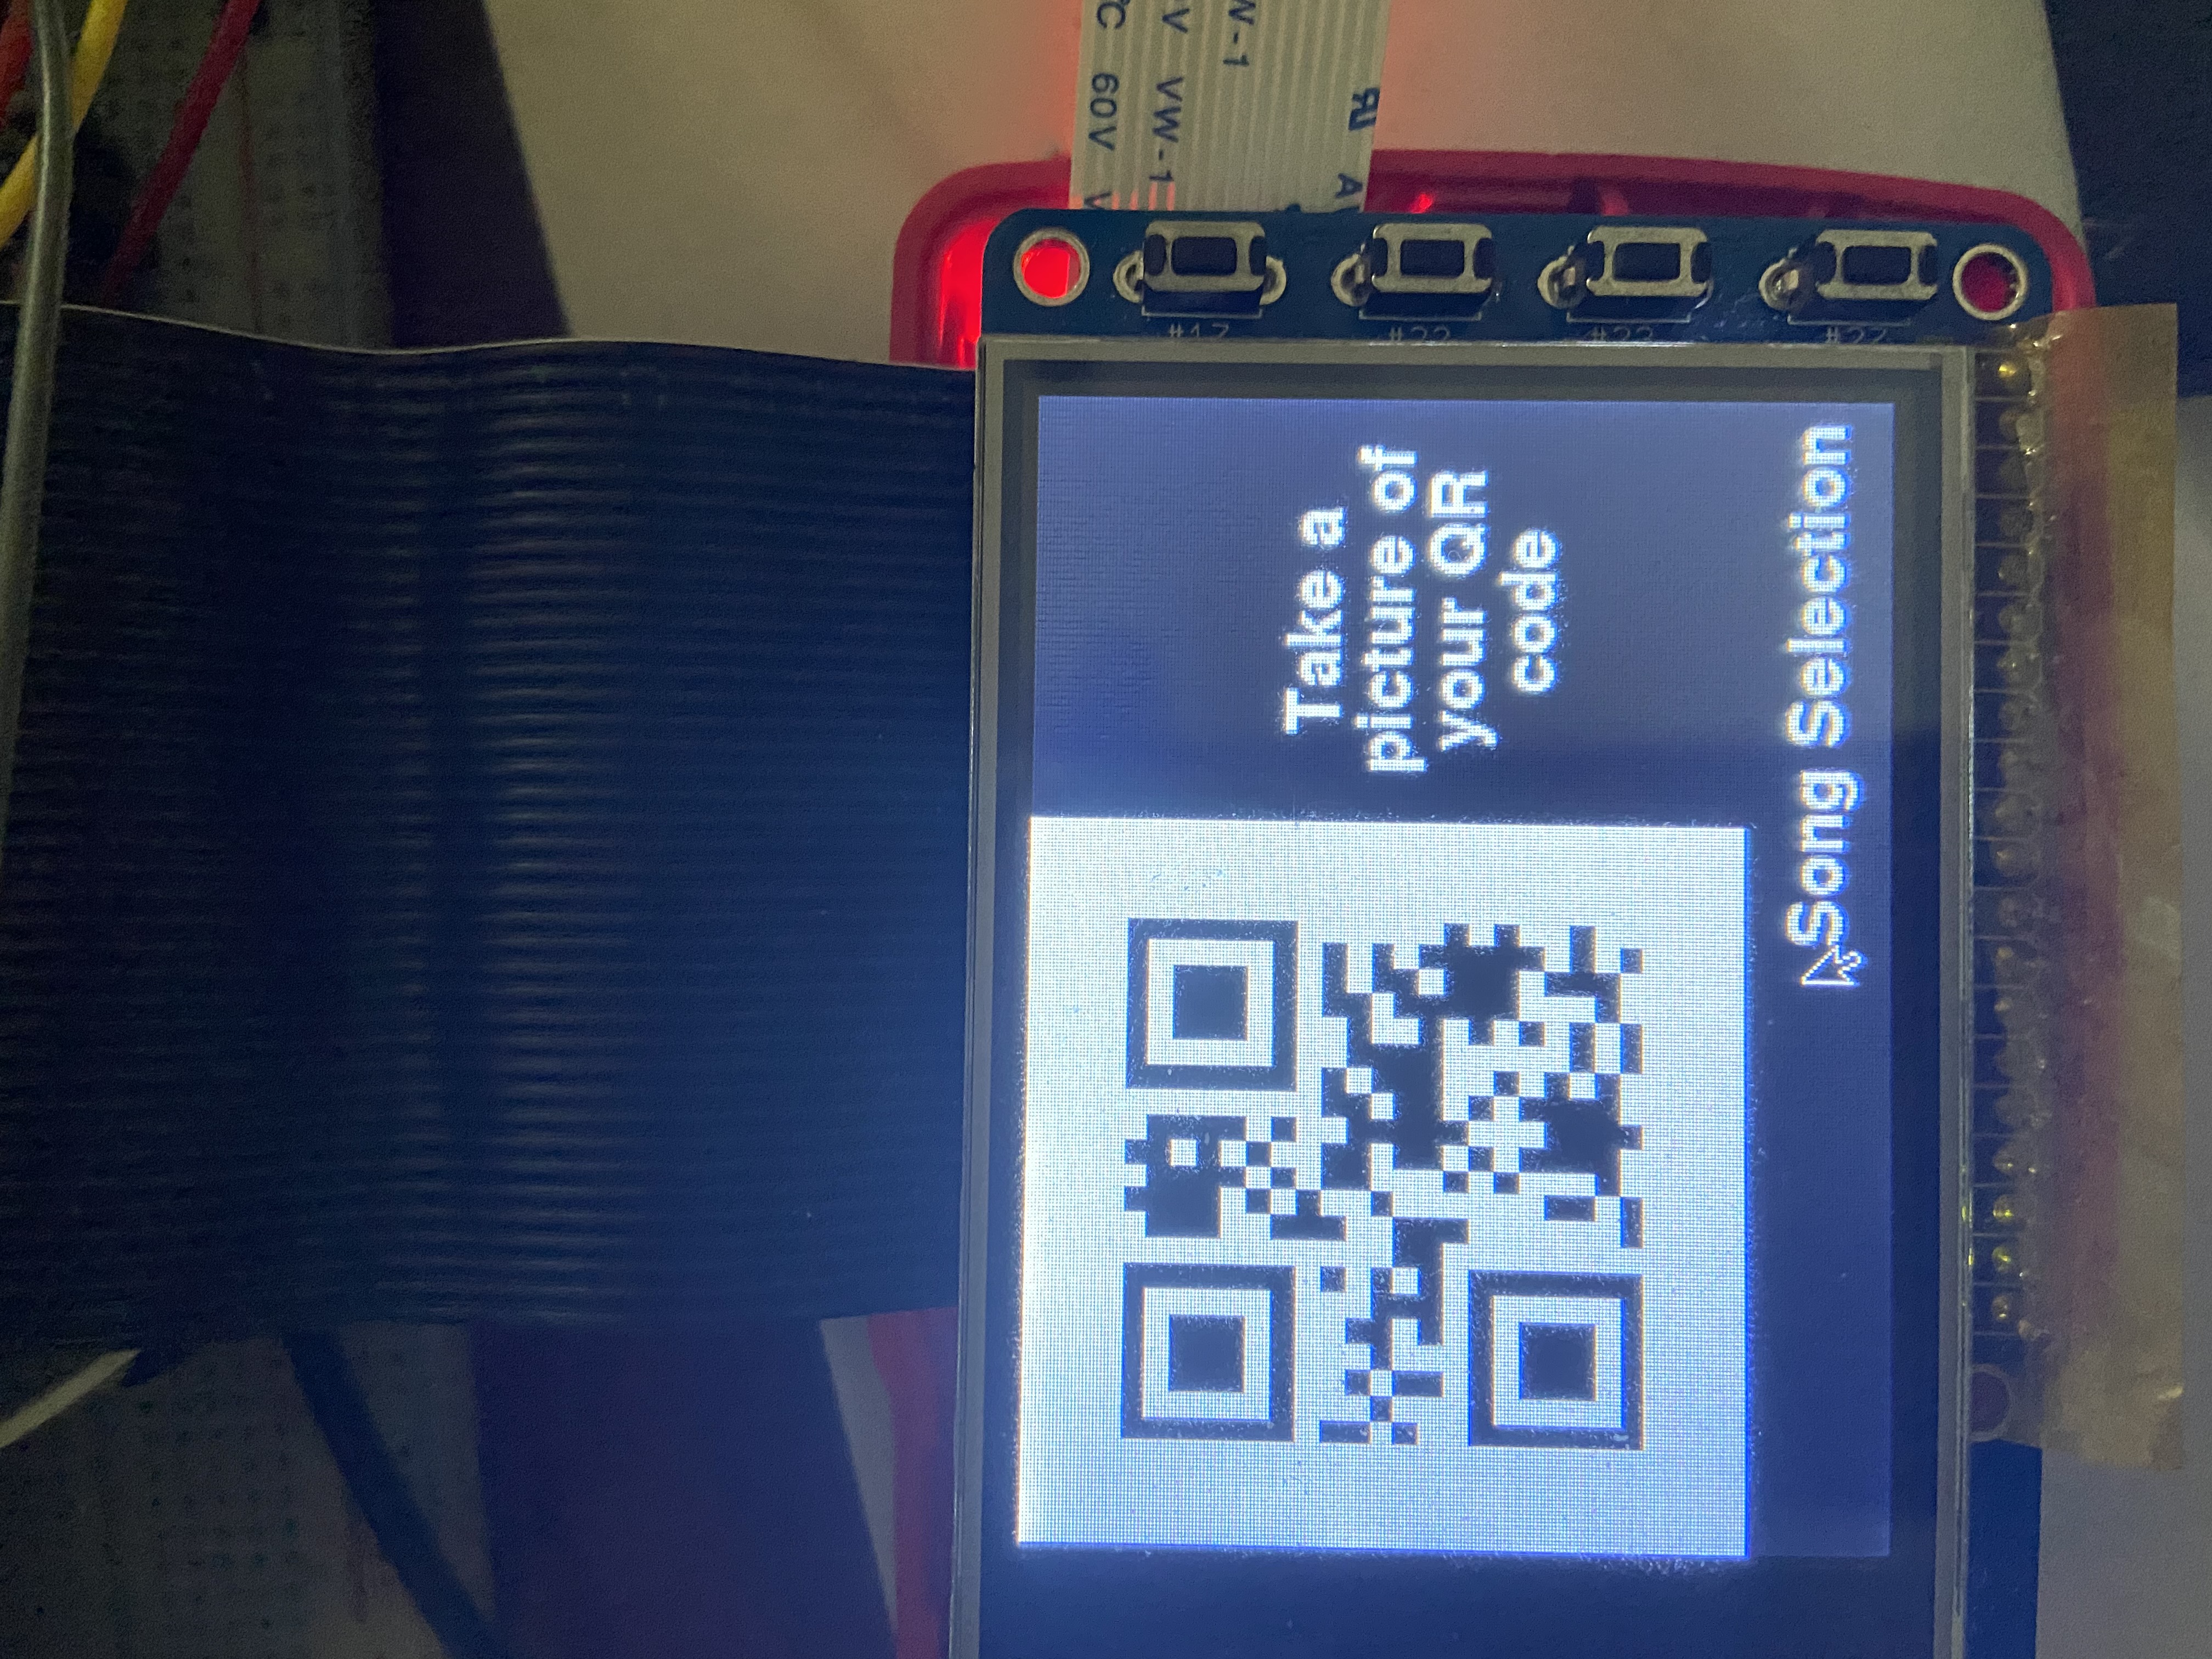
Figure 10: New user QR code display
Once the user saves their QR code and presses the ‘Song Selection’ button, the songs from the song_library folder are shown with each song’s information and album cover image on one page. The user can then use ‘Prev’ and ‘Next’ buttons to traverse through the songs. Pressing on the ‘Select’ button adds the song to the user’s playlist which was created in the last step. Once the user is done selecting the songs they can press the ‘Done’ button which redirects the user to the first instruction screen.
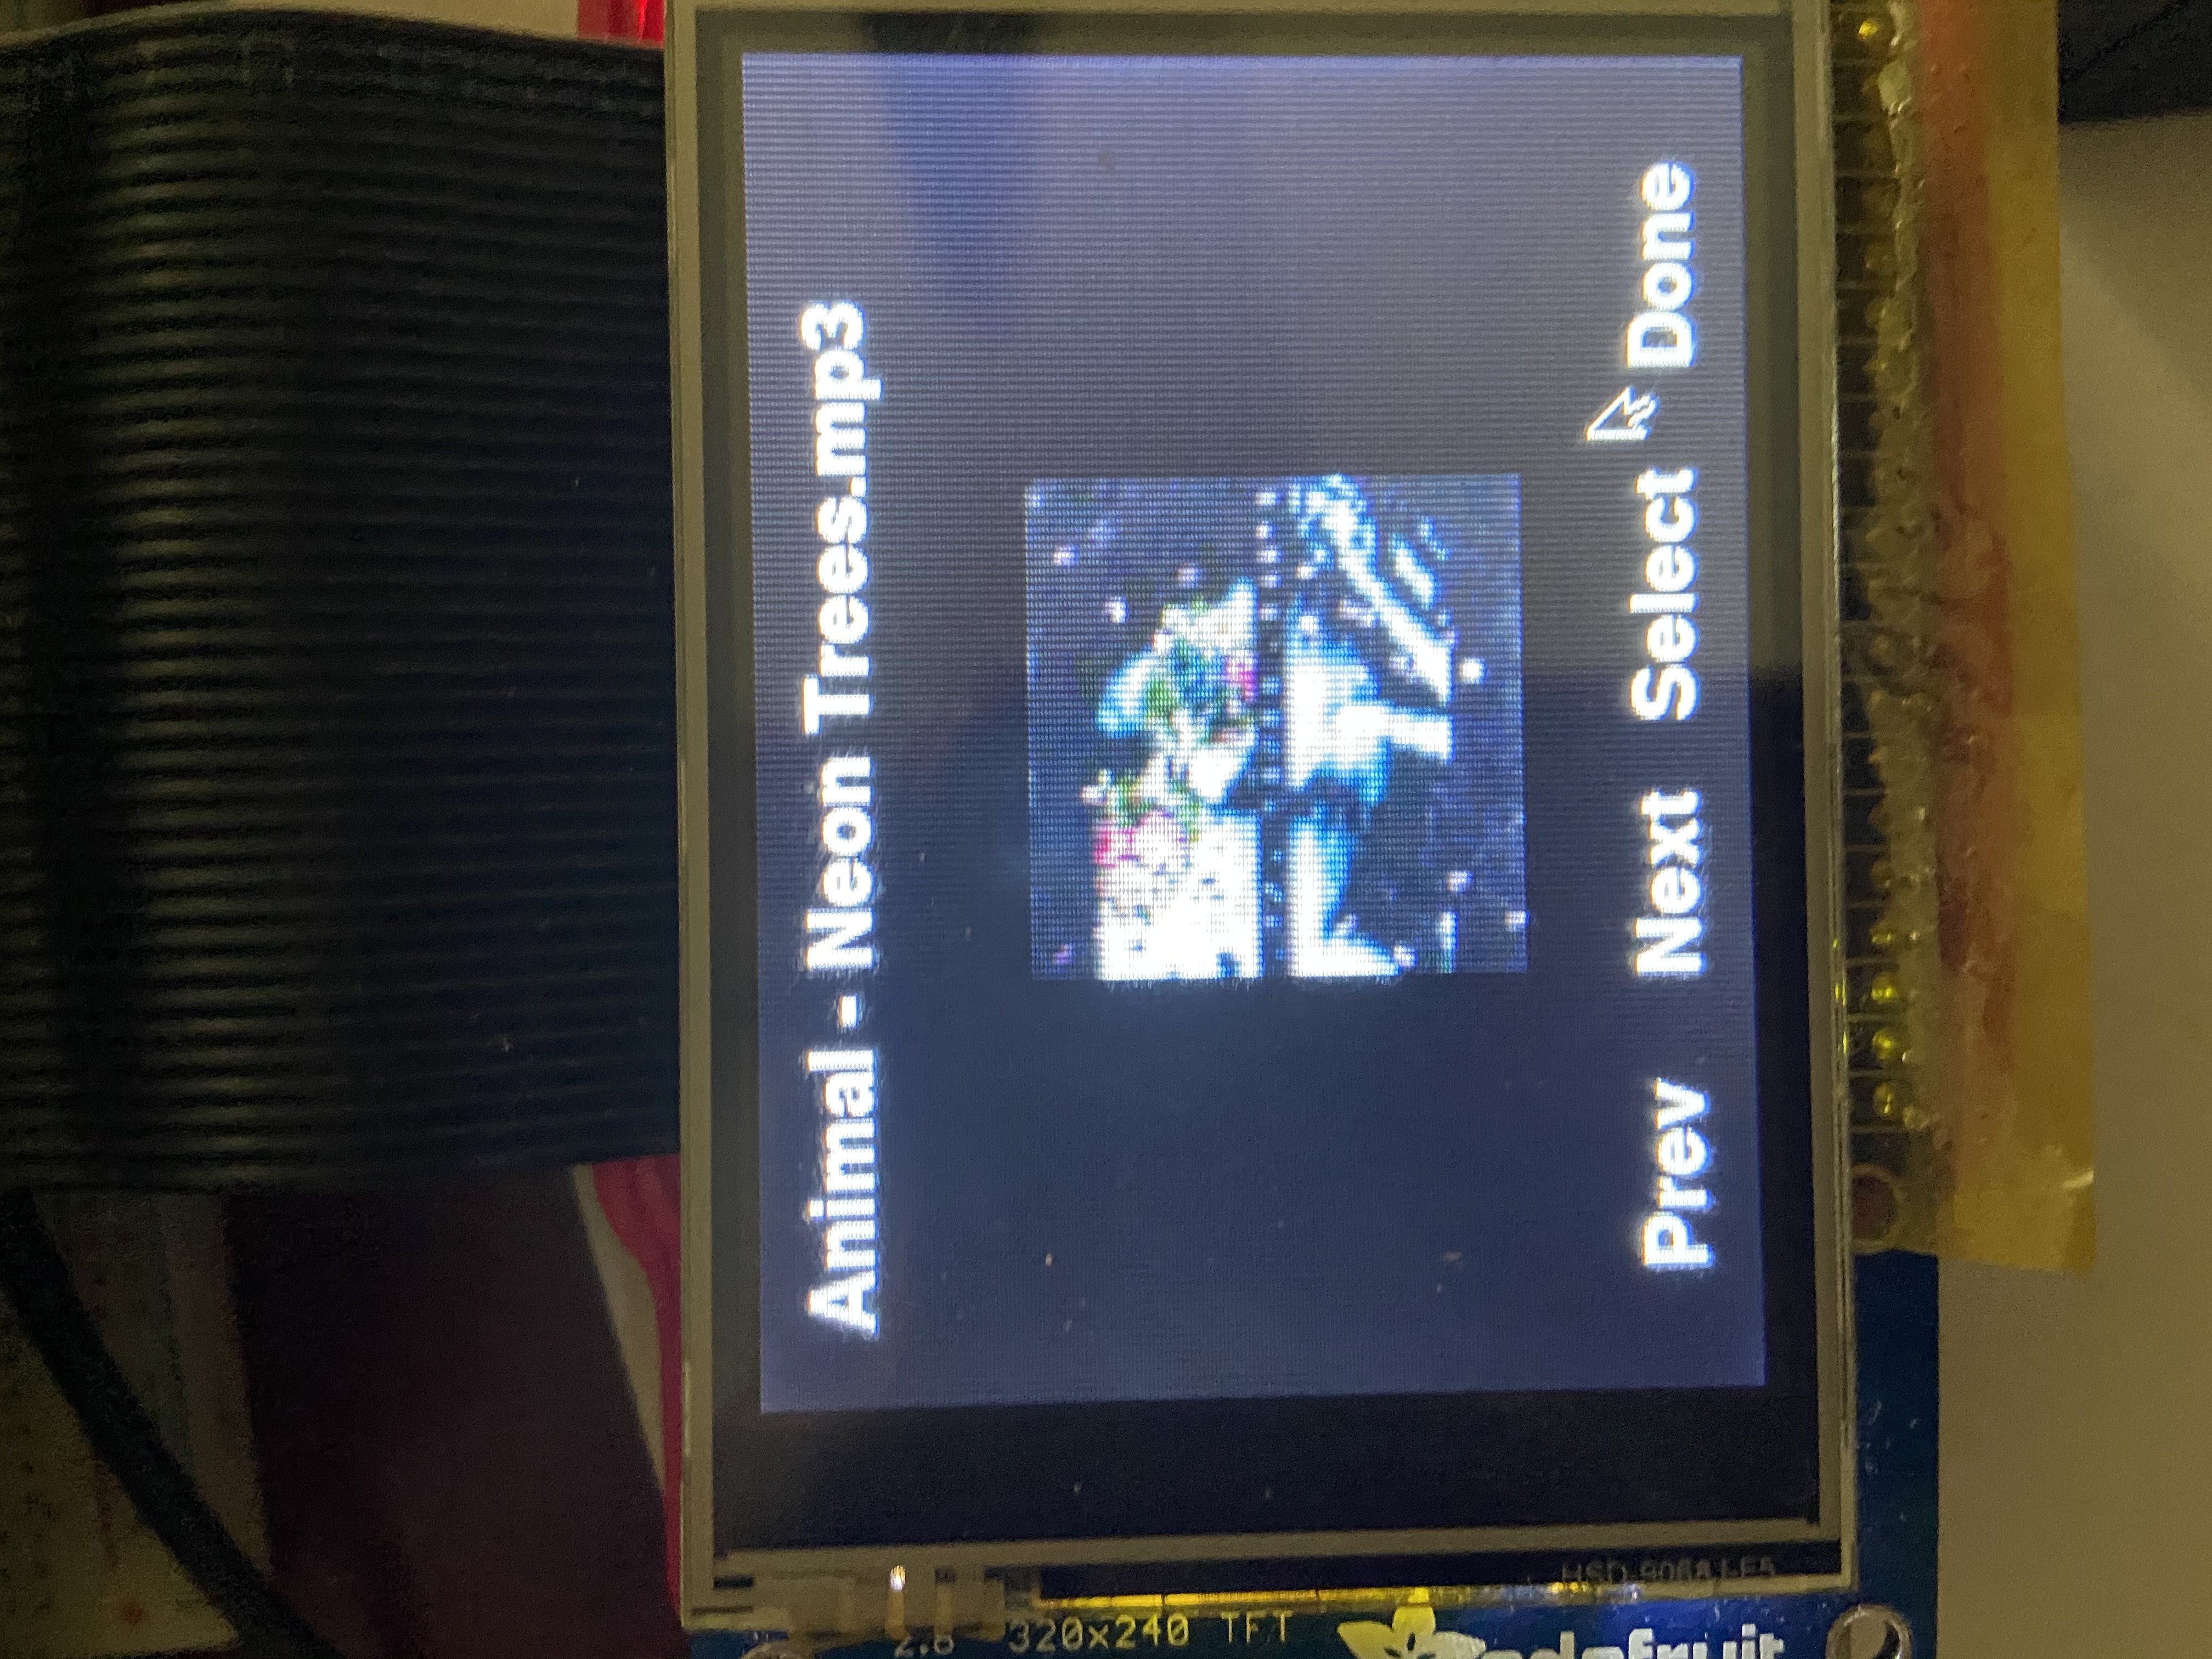
Figure 11: New user playlist selection interface
Any user who has a pre-existing saved QR code and playlist only needs to press the ‘Next’ button from the instruction screen which will show them one more instruction screen with information on the touchless control sensors. Pressing ‘Next’ again shows the scan initiation screen. These two screens are shown below
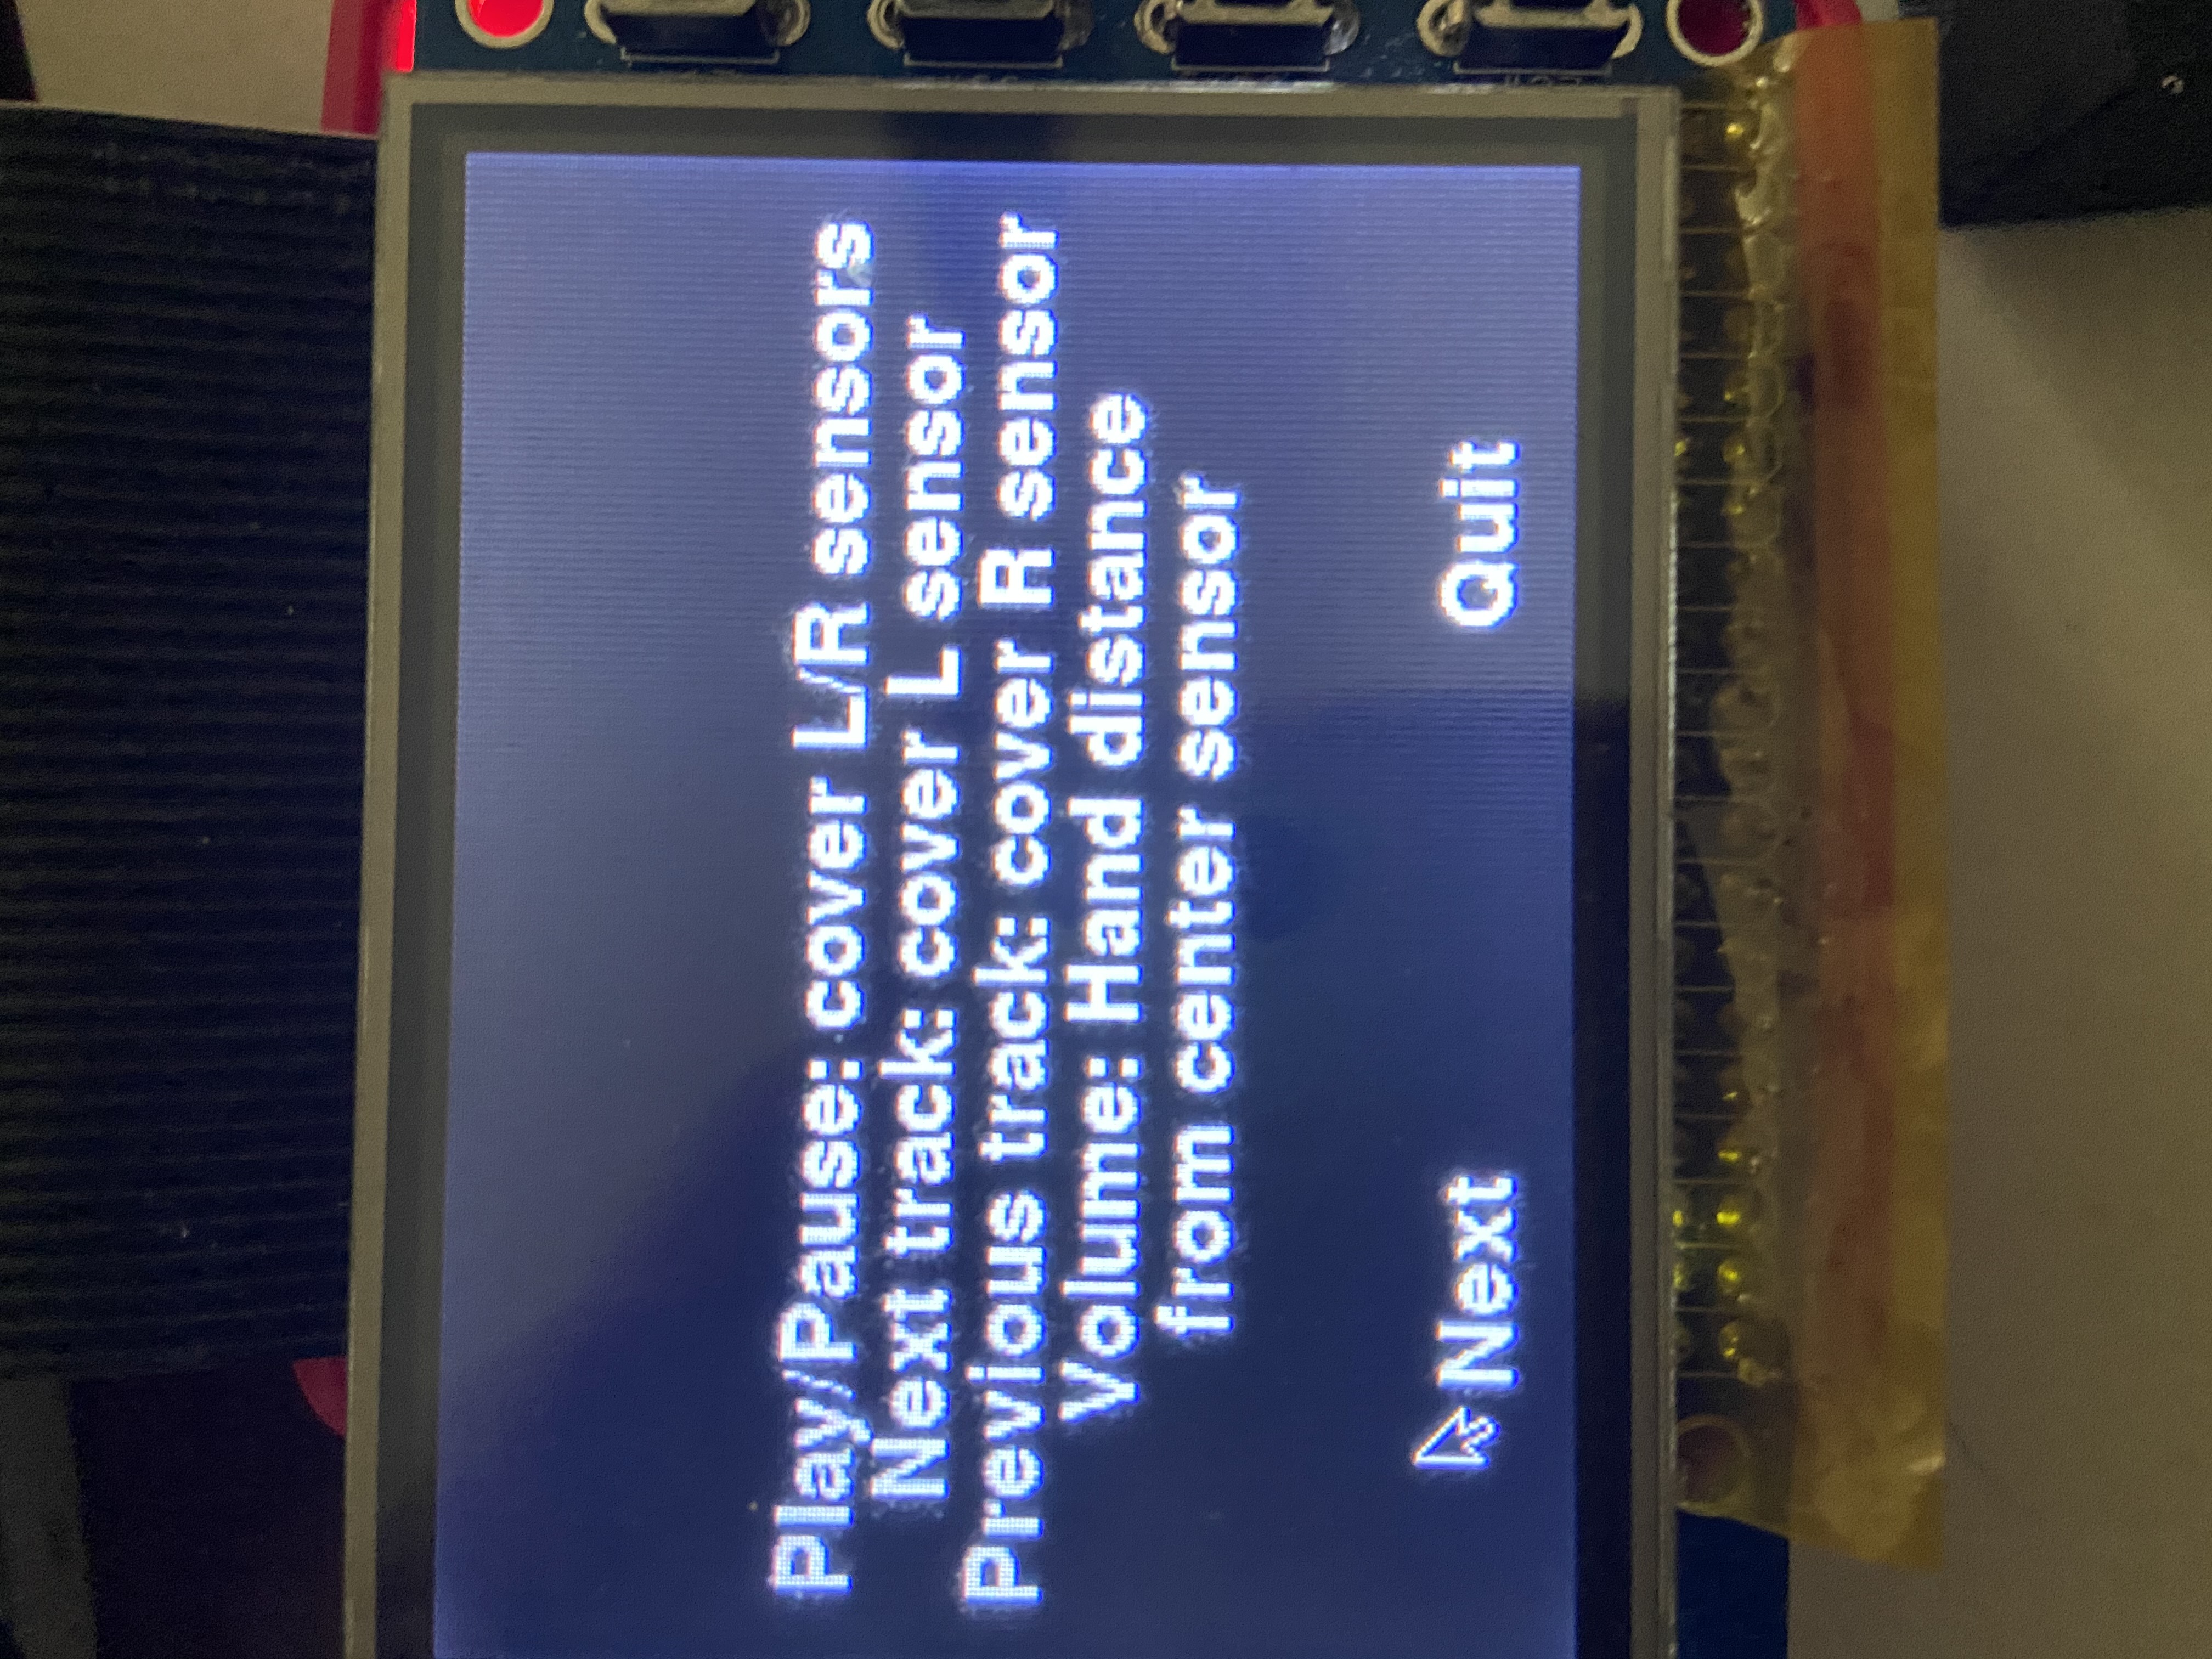
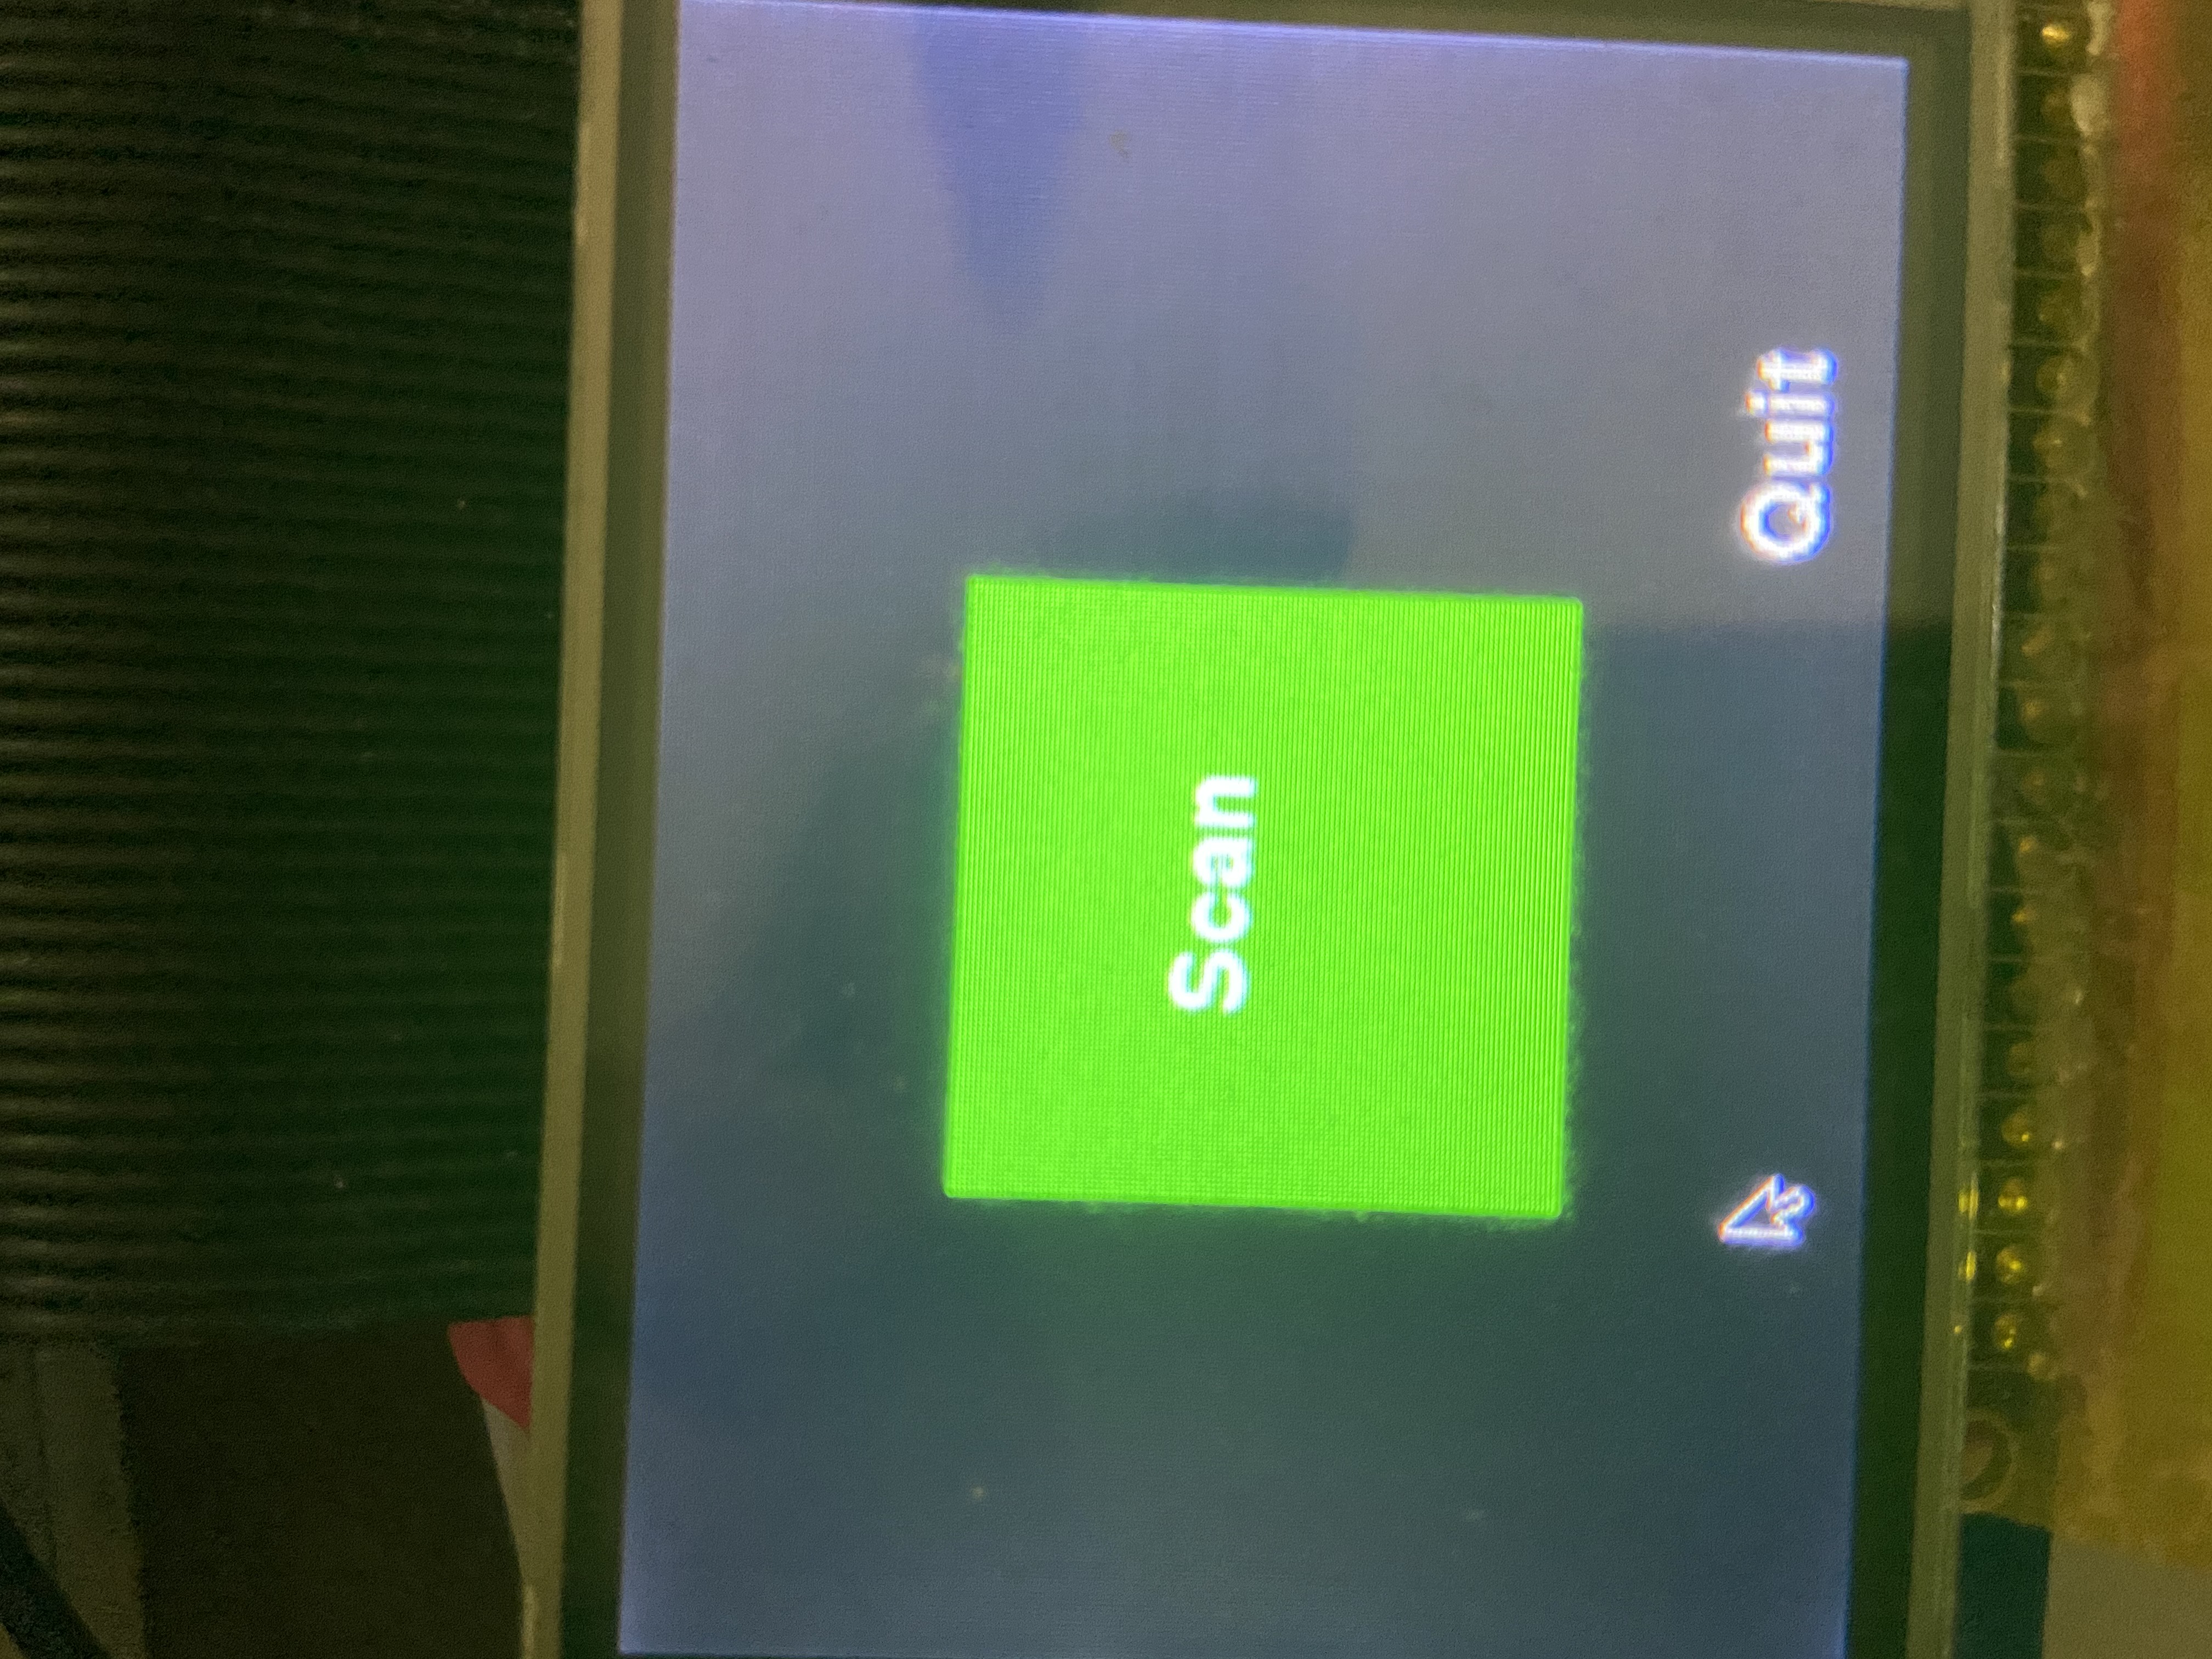
Figure 12: Second instruction screen and scan initiation screen
Pressing on the green ‘Scan’ button on the scan screen displays the camera window on the PiTFT screen which the users can then use to orient their QR code for scanning. Once the scan is successful the user is redirected to their already existing playlist and from there the user can use hand gestures to play/pause, change songs, and increase/decrease volume. There is also a ‘Quit’ button in the GUI which takes the users back to the initial start screen once they are finished playing songs. The music playing user interface is shown below.
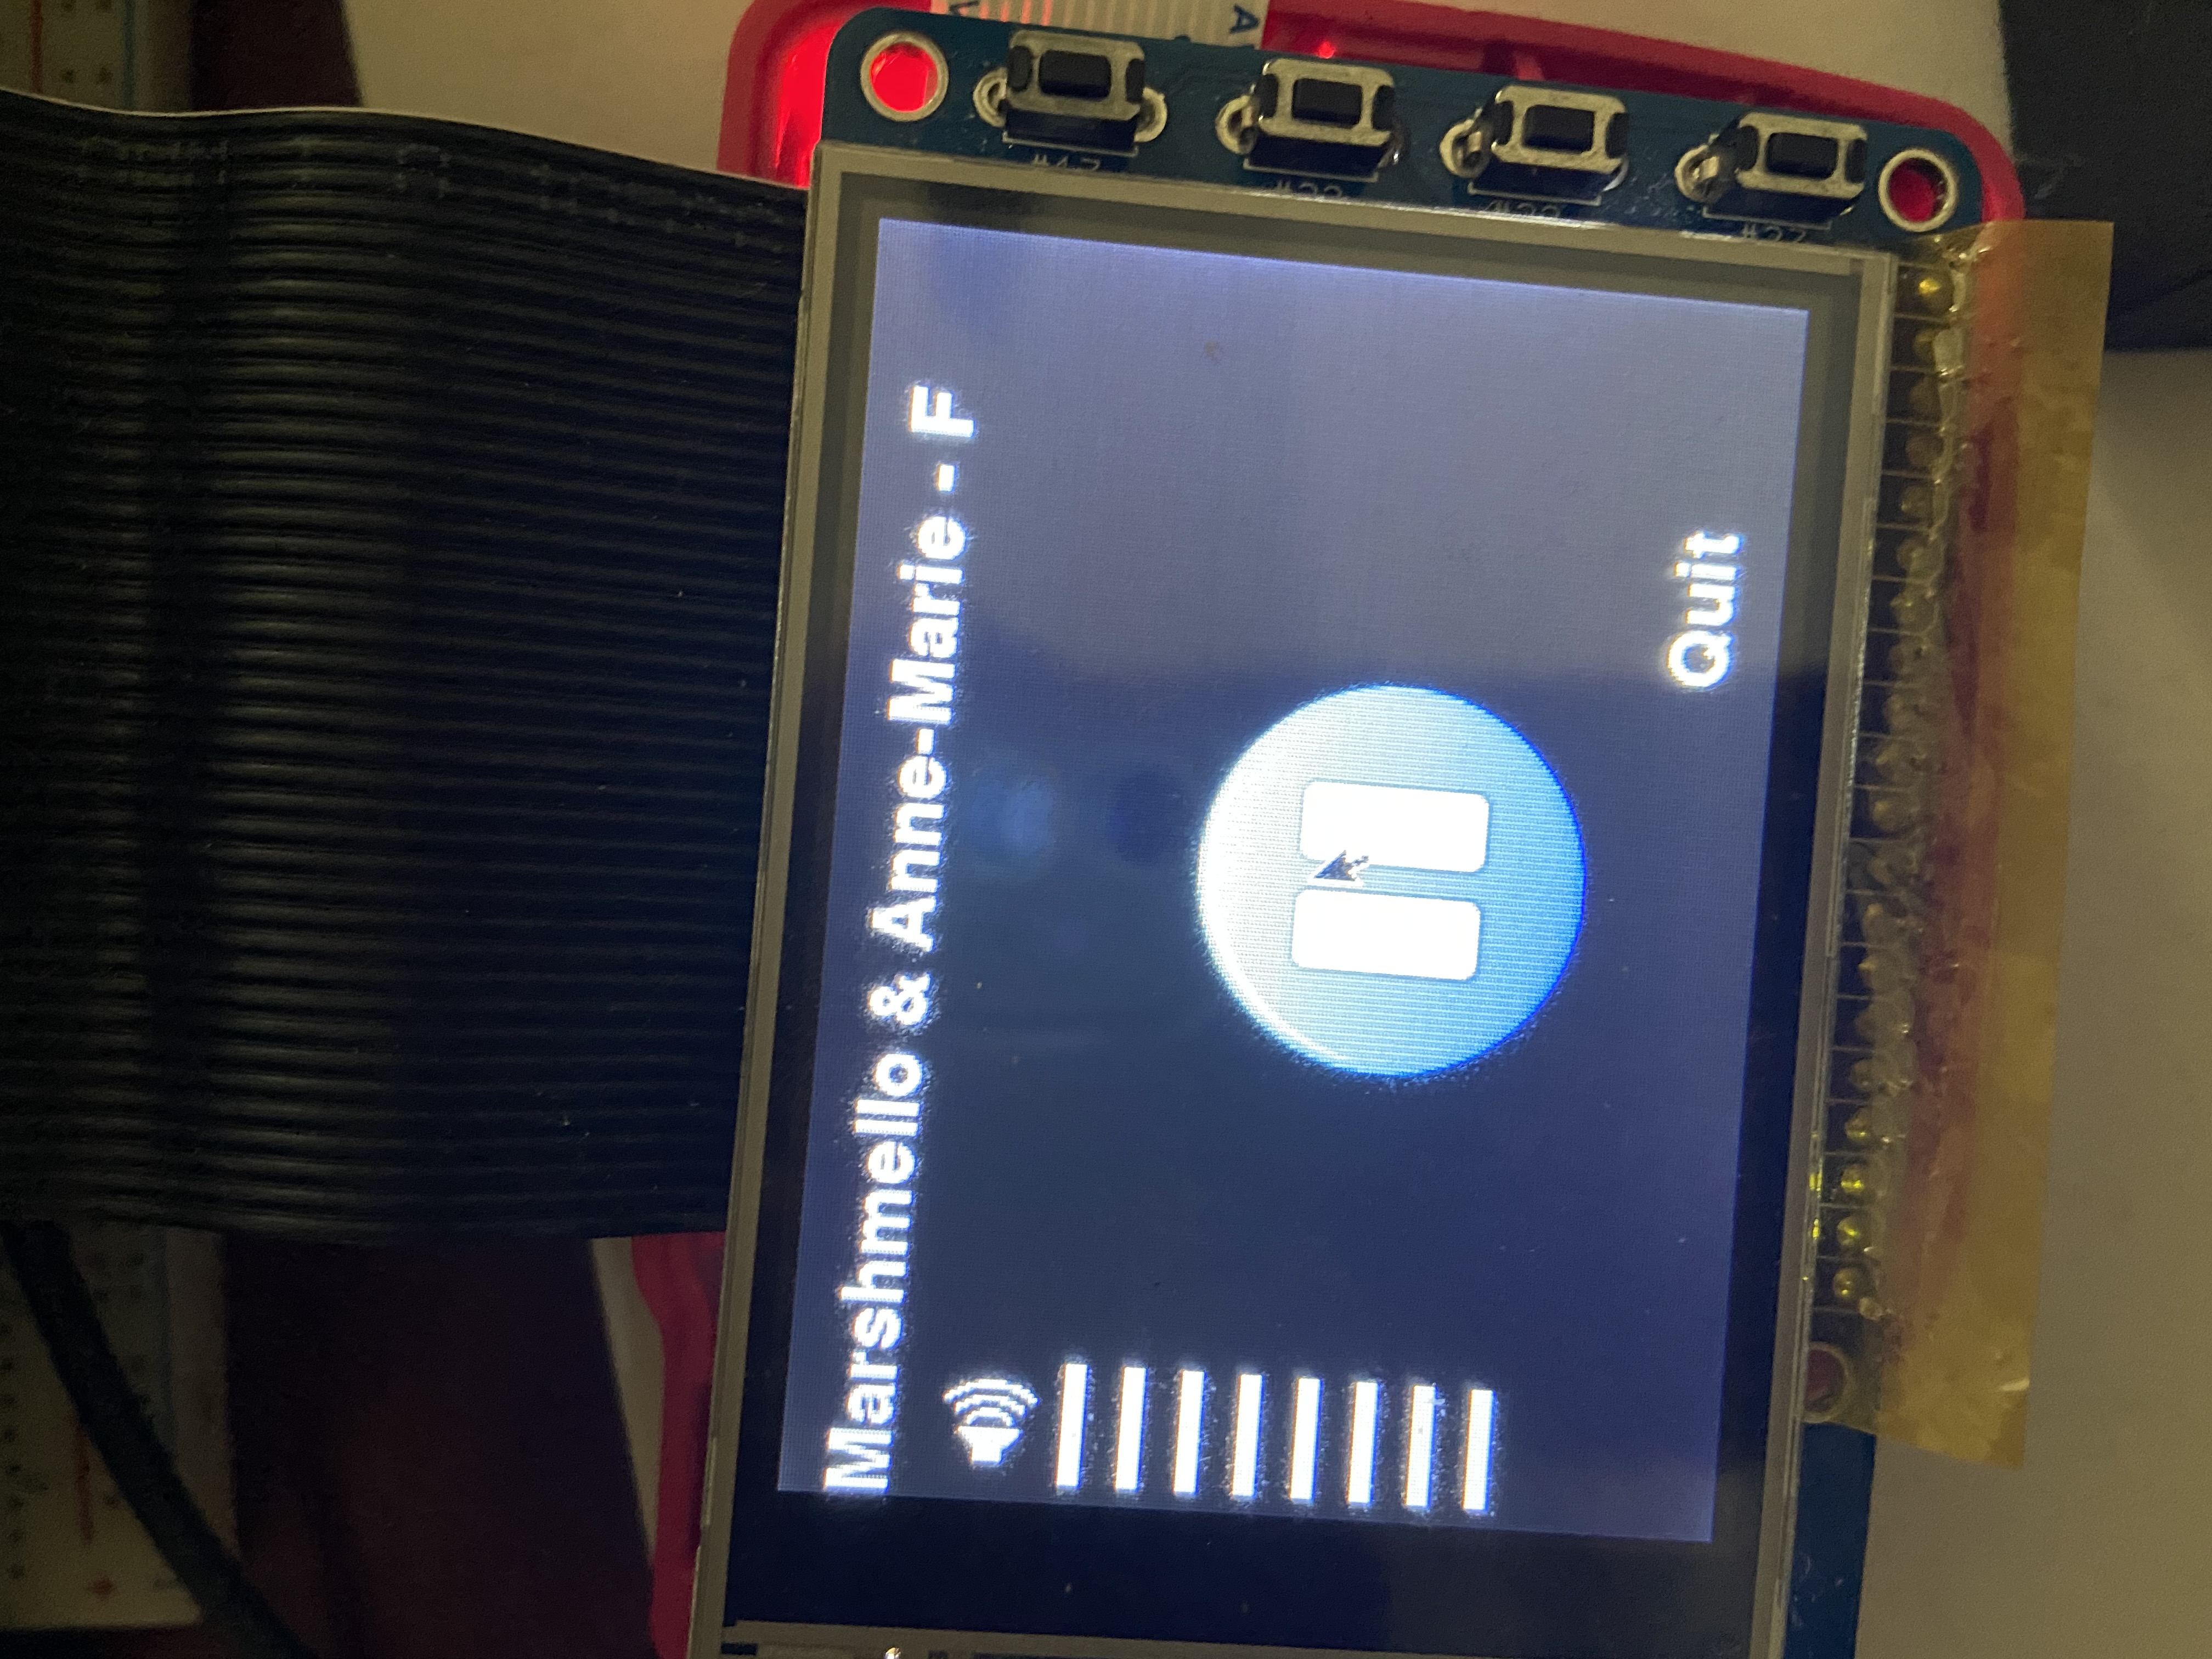
Figure 13: Music Playing Interface
Mounting scheme: CAD and 3D printing:
In designing our mounting enclosure for the hardware, we began by listing the needs of our electrical system. First was our primary motivation for the mechanical component: a mounting scheme for the break-beam sensors that would align both pairs and raise them to a height that was suitable for controlling with hand gestures. Second, we also wanted a cover to contain all of the wiring and breadboard, so that it would be out of sight of the user as well as protected from any accidental motion or snags that could disrupt its function. We also decided that we wanted a cutout to place the ultrasonic sensor in the center of the mounting enclosure. Finally, we decided that we wanted a stand for the Raspberry Pi to act as a display, as well as a place to mount the PiCamera.
After determining the needs of our mechanical system, we sketched out a rough idea of what we wanted the prototype to look like. Our preliminary design sketch can be found in Figure 15.
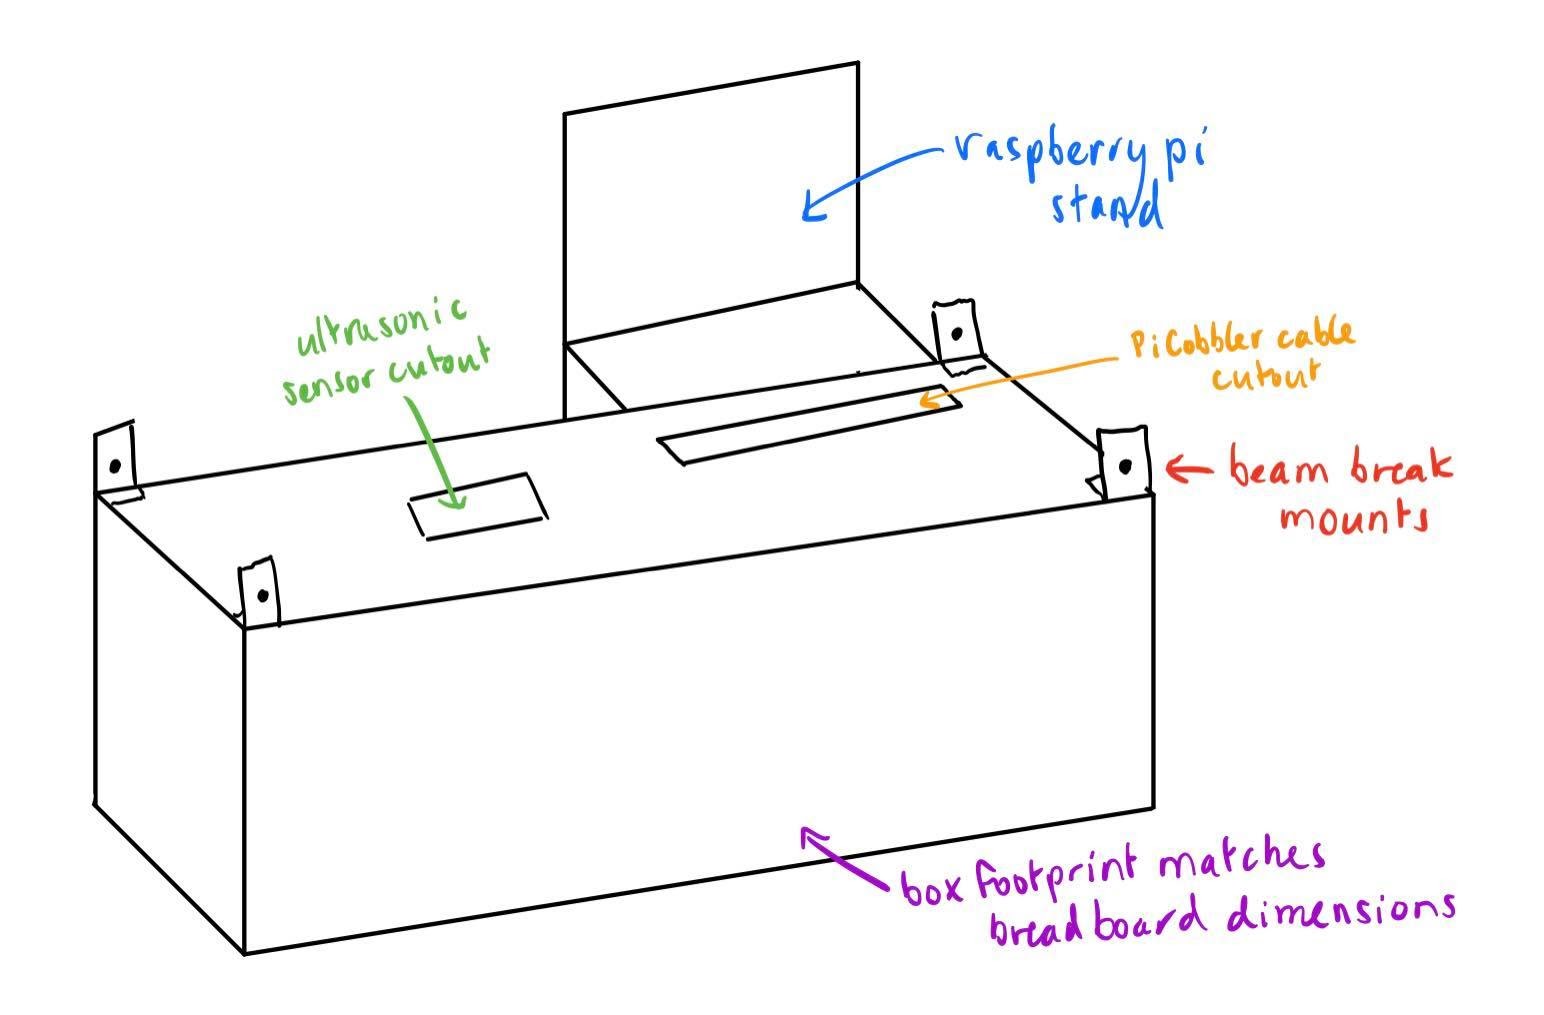
Figure 14: Initial sketch of mounting enclosure design
We also measured all the electrical parts with calipers to ensure exact fits in our prototype, including the break-beam sensors (and their mounting hole diameters), the ultrasonic sensor, the breadboard, and the Raspberry Pi case. Based on our initial measurements and rough sketch, we rendered our design in CAD using Autodesk Inventor. Different angles of our prototype in CAD can be seen in Figure 16 below.
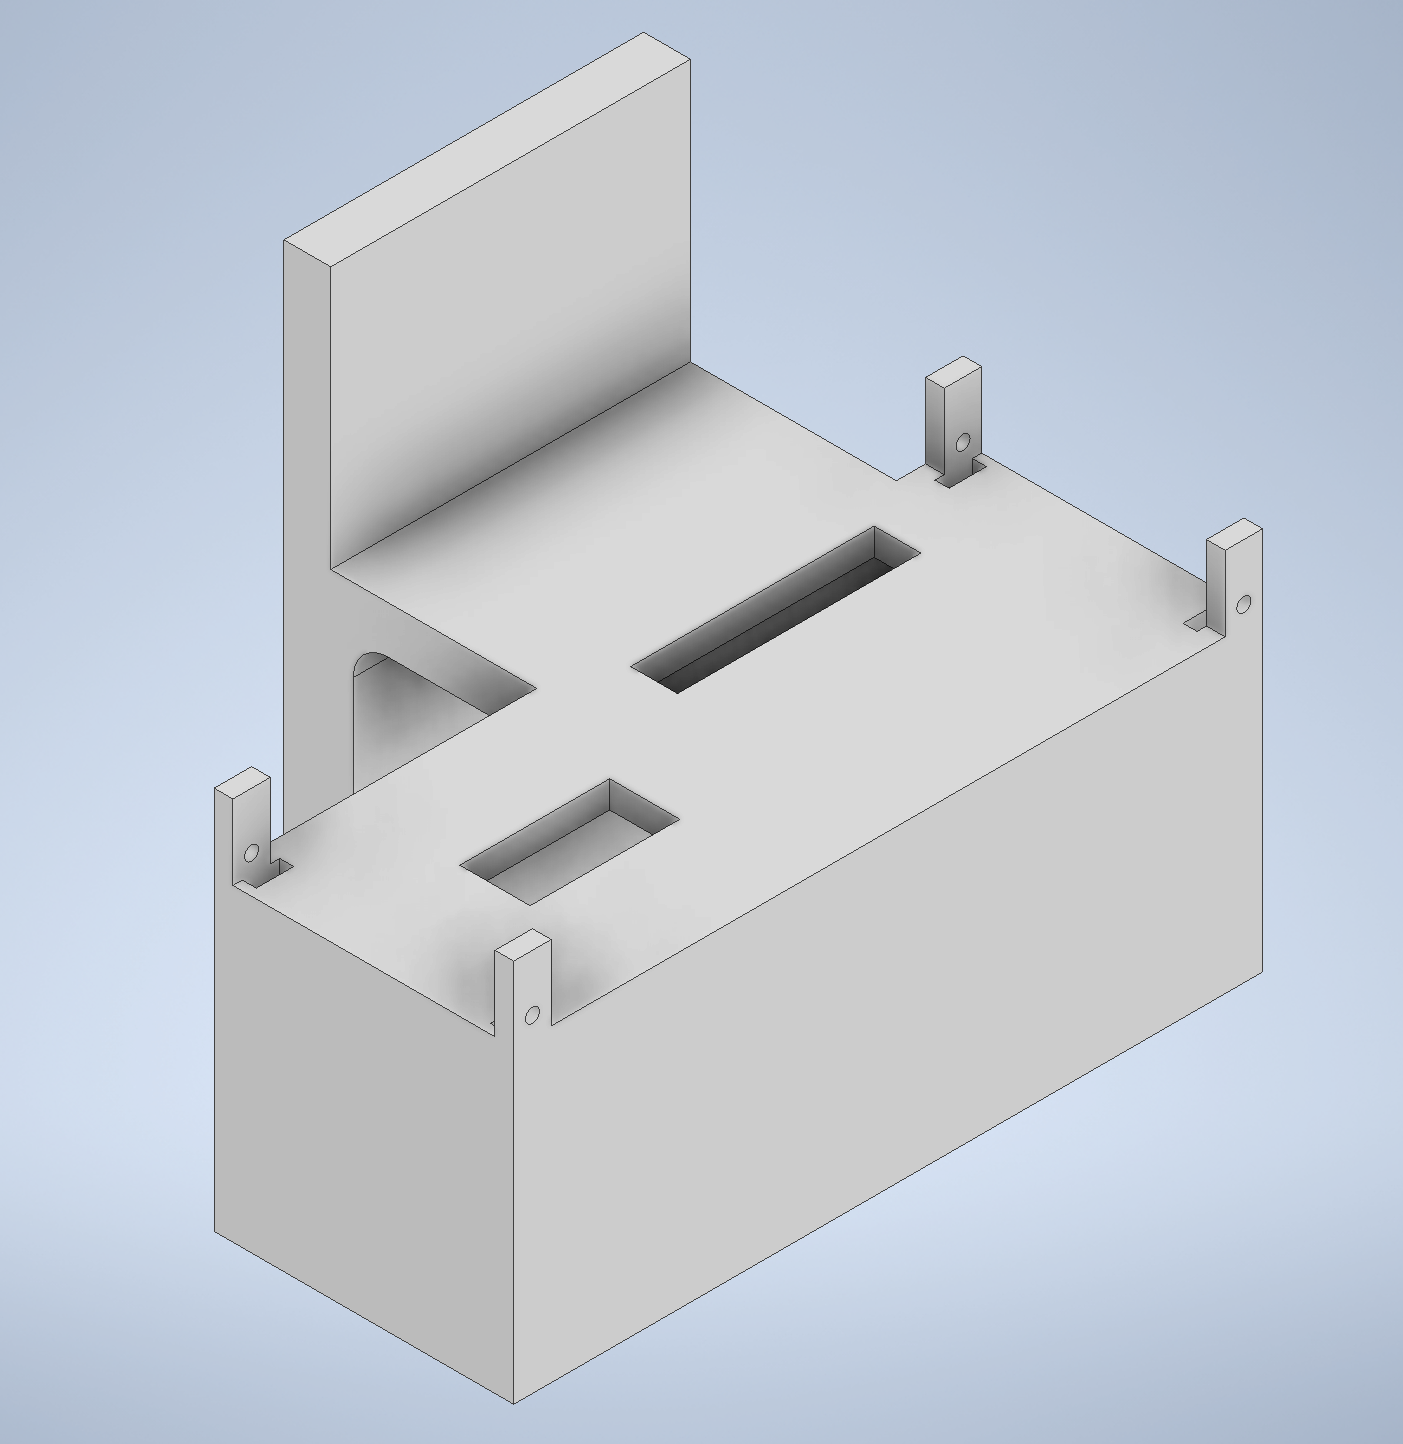
Figure 15: Mounting enclosure inCAD
Finally, we exported the design as a STL file to be 3D printed. However, we ran into some issues with the first iteration of our part, as it was extremely difficult to orient and slice on a 3D printer and used a ton of supports which wastes a lot of material and time. The first iteration rendered in the printer software can be seen in Figure 17 below, with the significant amount of support material highlighted in green.
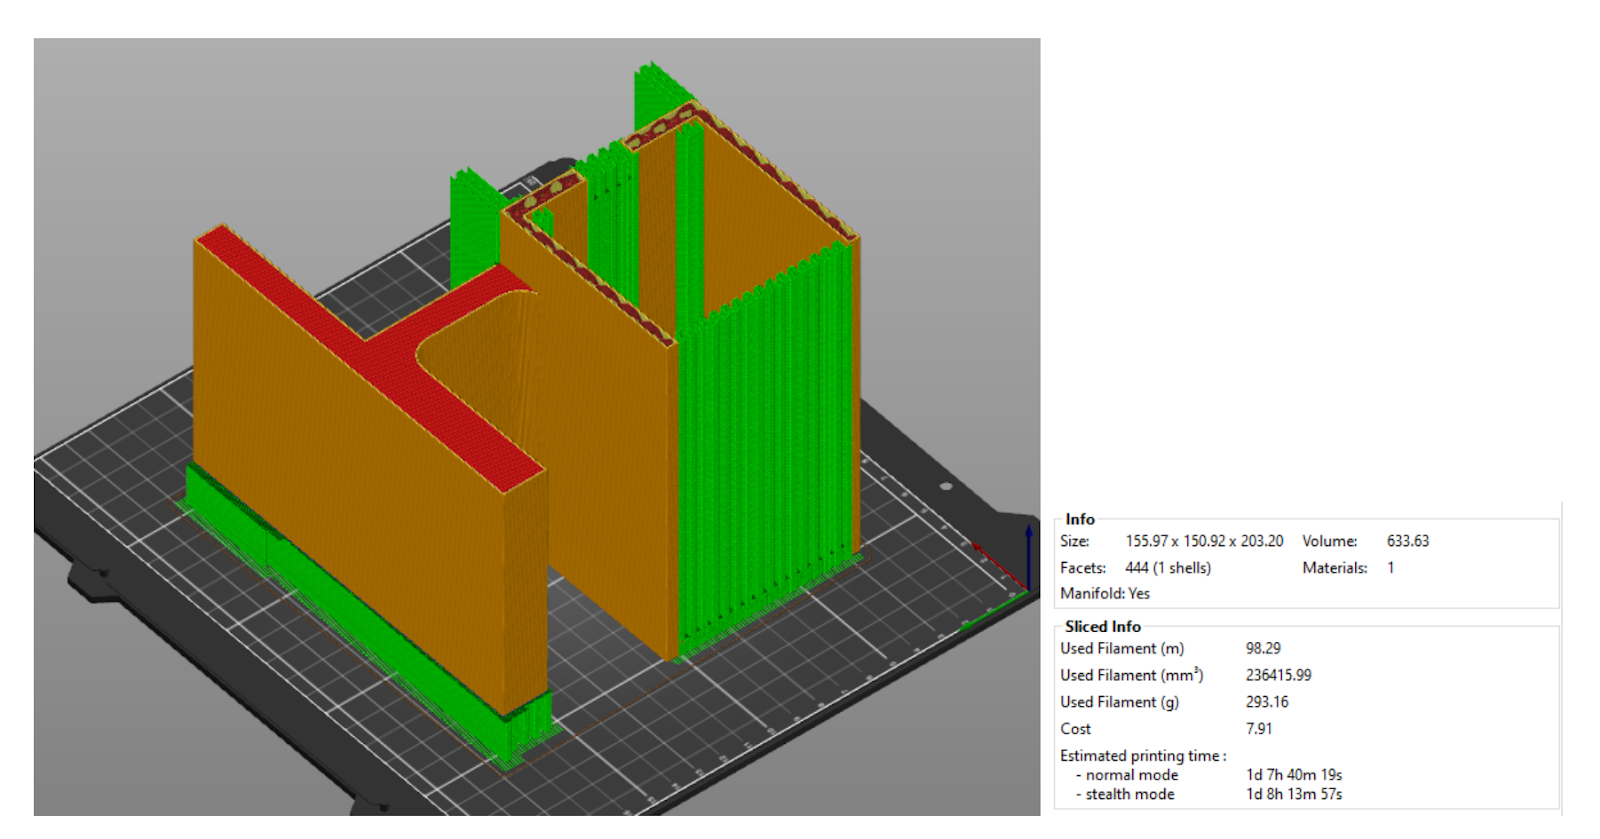
Figure 16: First iteration printing specs and 3D rendering
To address the printing issues, we chose to split our mounting enclosure into two separate pieces - one for the Raspberry Pi stand, and one for the breadboard cover and sensor mounts. This significantly improved printing time, and reduced the amount of wasted material on supports. The second iteration, with more efficient supports shown in green, can be seen in Figure 18. Note the printing specs again on the right side, which indicate a lower material usage and cut a significant amount of time off of the printing process. The final printed parts can be seen in Figure 19. Once both parts were printed, we assembled the full mounting enclosure by hot gluing them together.
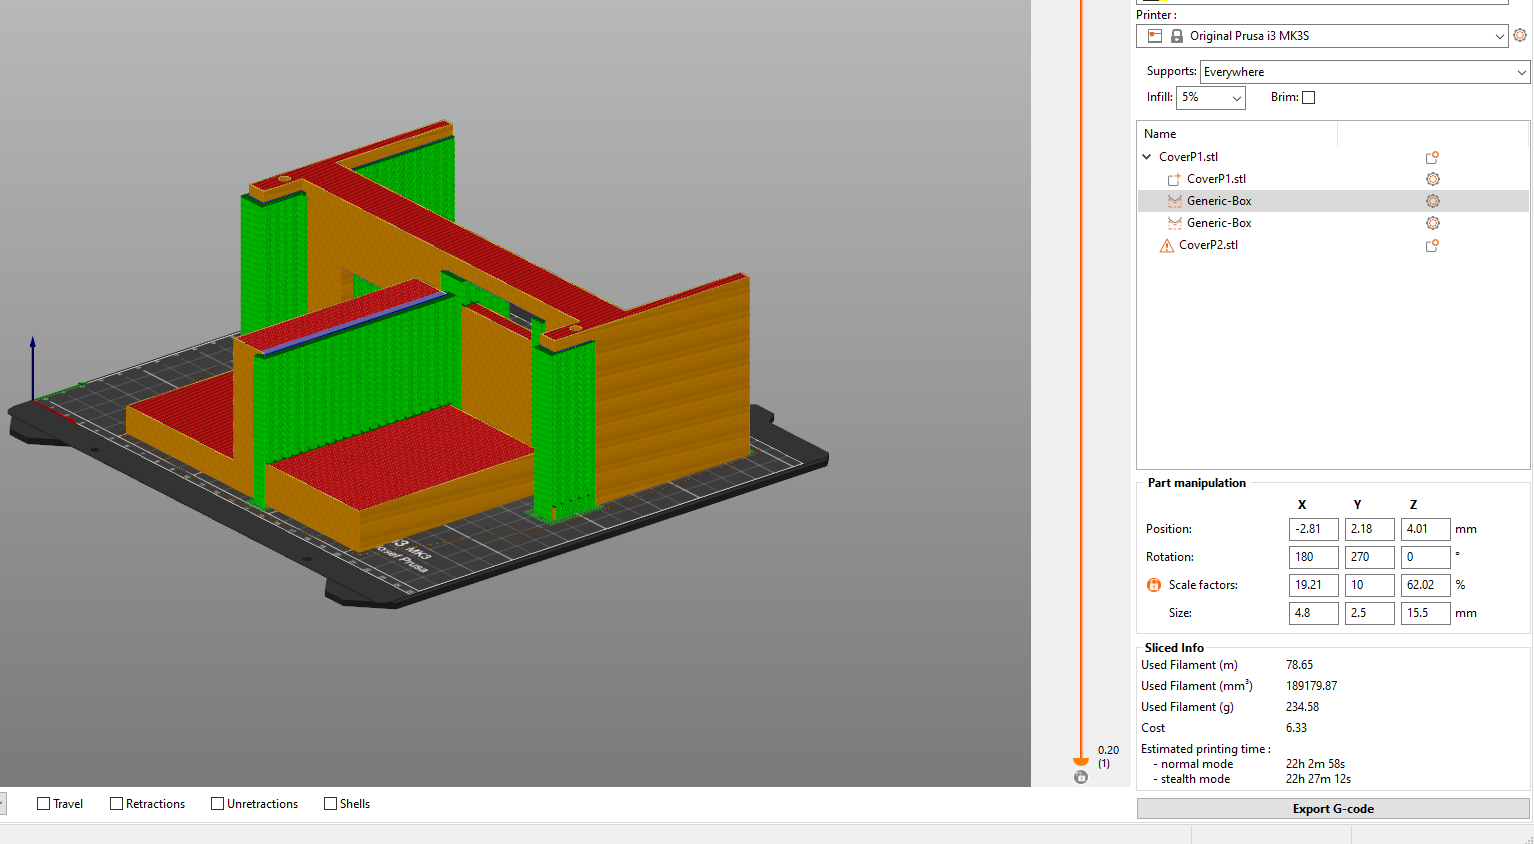
Figure 17: Second iteration printing specs and 3D rendering
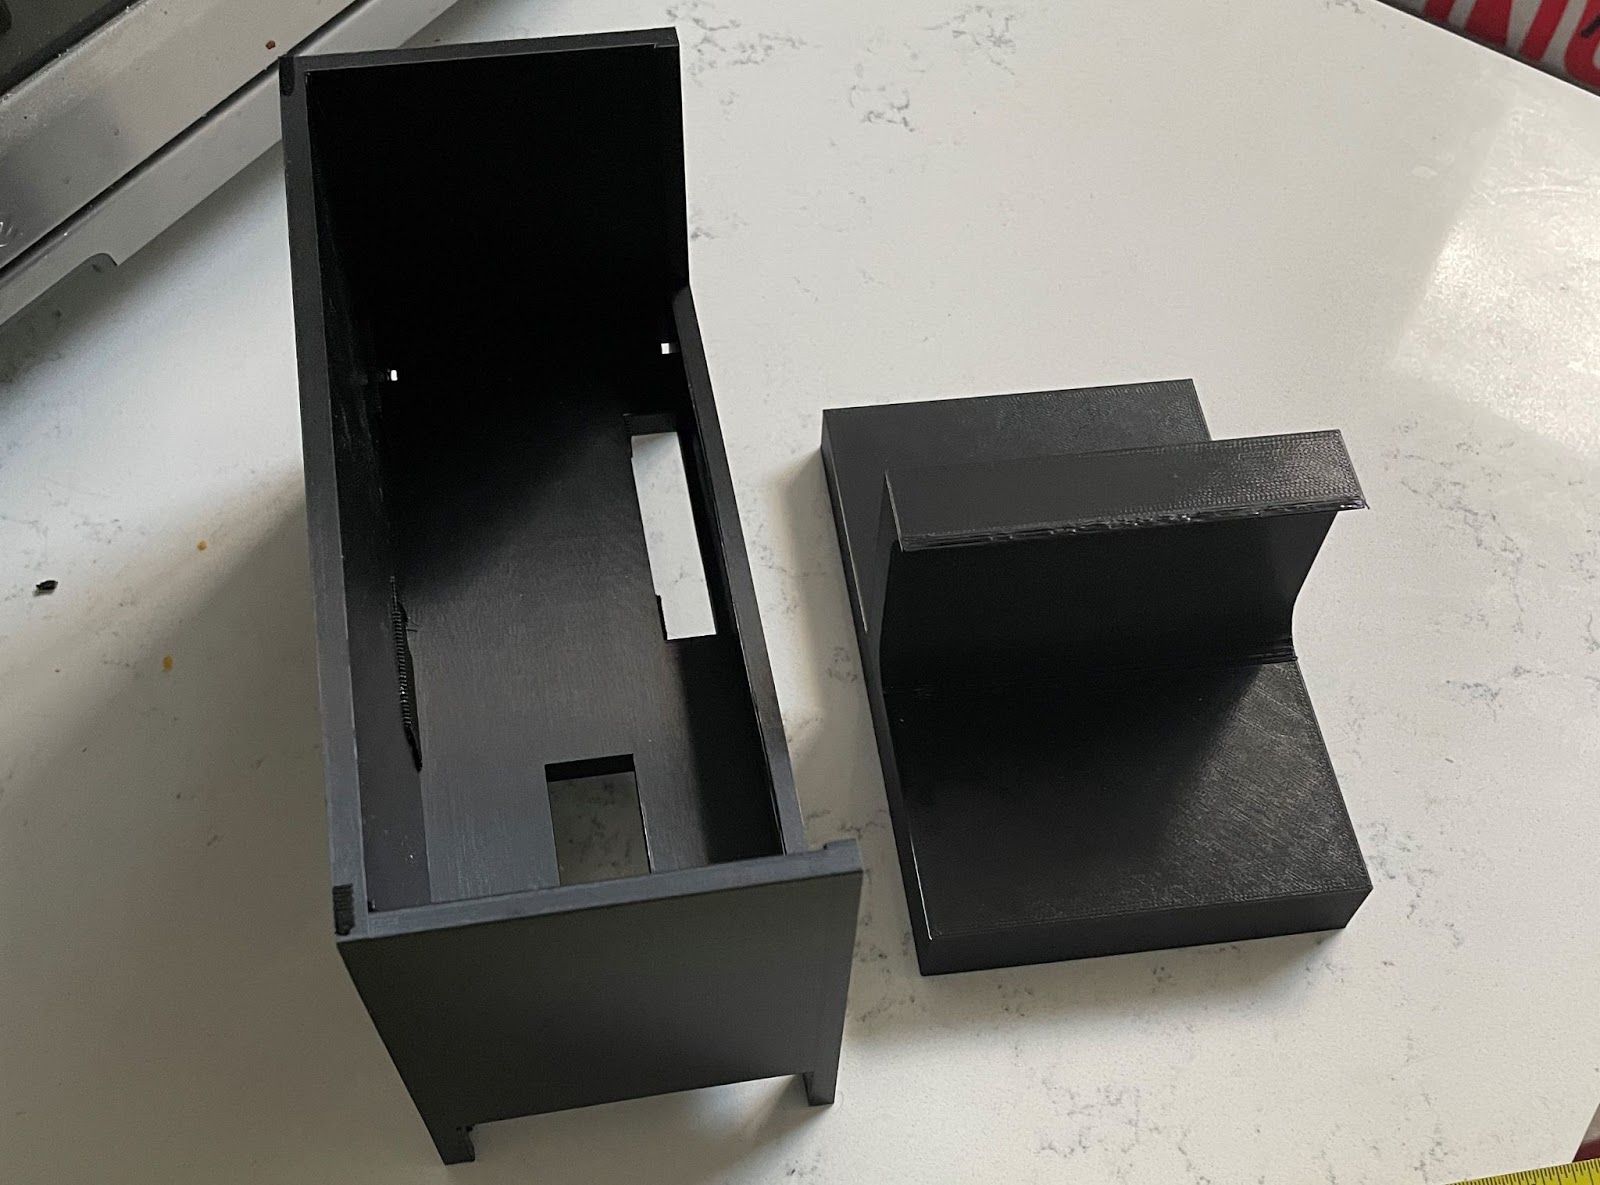
Figure 18: Final printed parts
Final product assembly: mechanical and electrical integration:
Once the 3D printed mounting enclosure was assembled, we mounted our sensors and the Raspberry Pi. The break-beam sensors were assembled on the mounting posts using M1.6 screws. However, we were not able to find M1.6 locknuts, so we secured the screws by placing a drop of hot glue on the back of each 3D printed post. We also taped the ultrasonic sensor to the edges of the enclosure cutout using electrical tape. Finally, to reach the breadboard underneath the enclosure, we spliced jumper wires to the ends of the sensor wires using solder-and-seal heat shrink connectors. Images of the installation process can be seen in Figure 20.
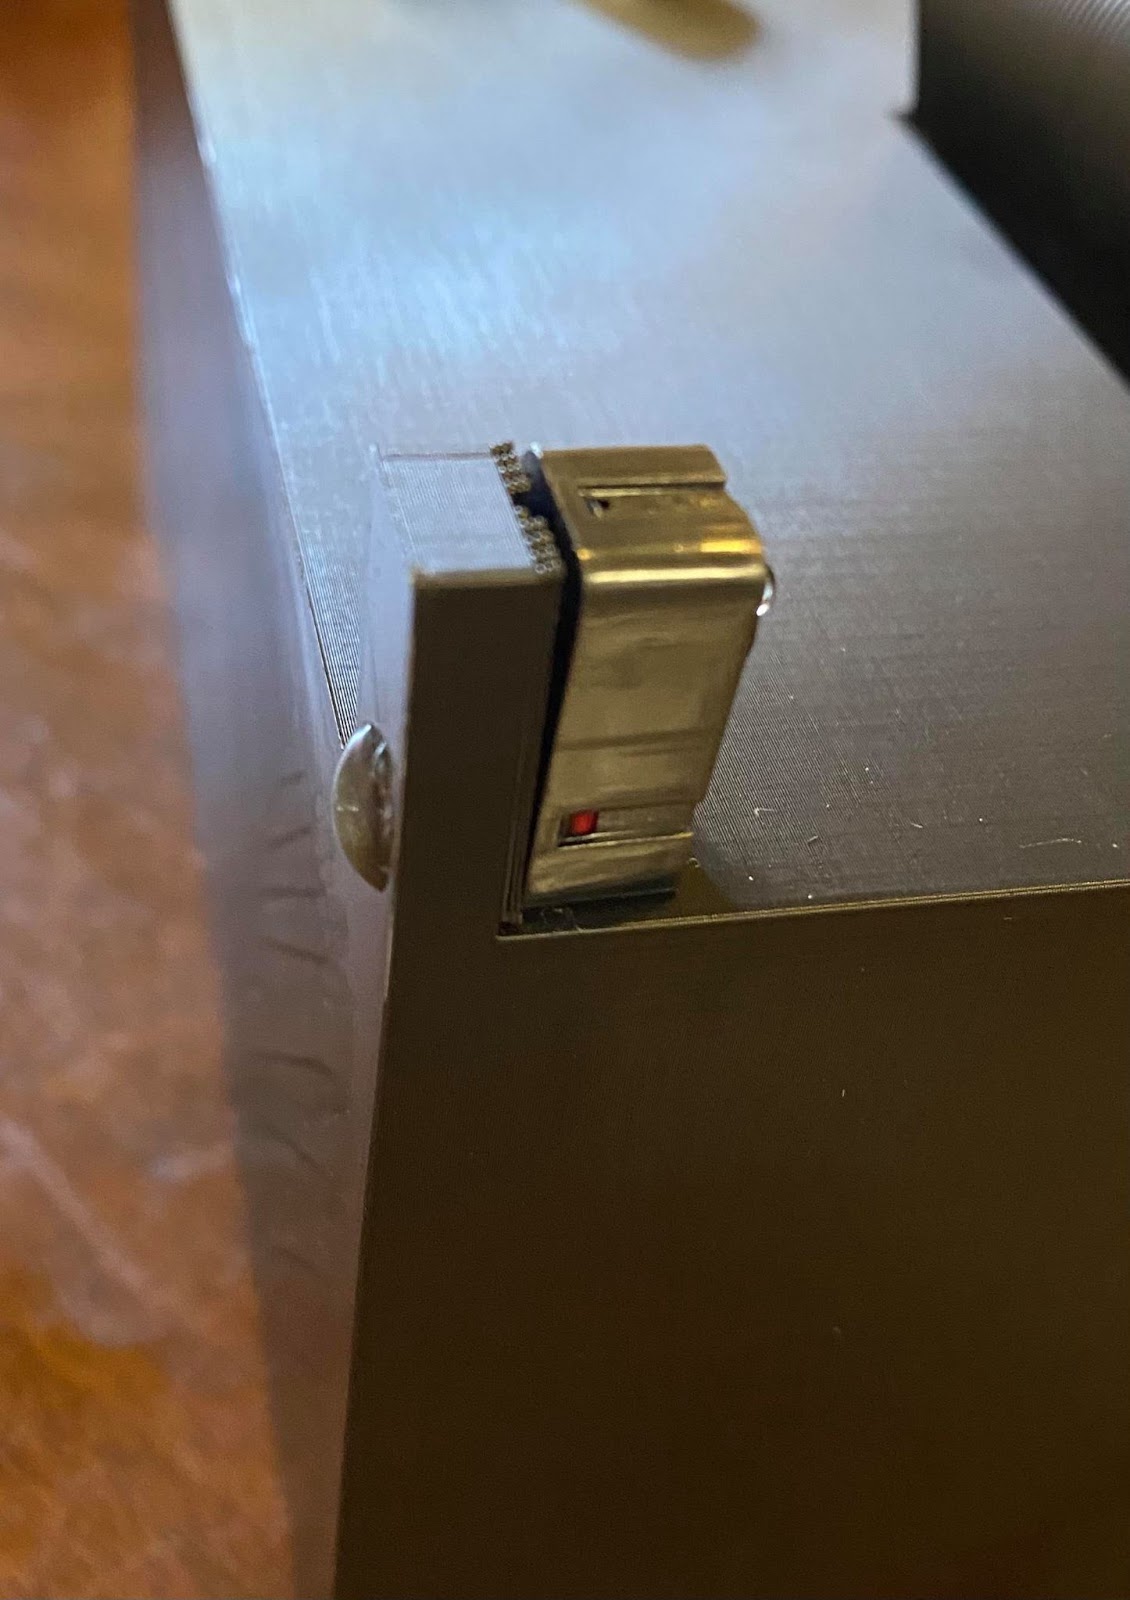
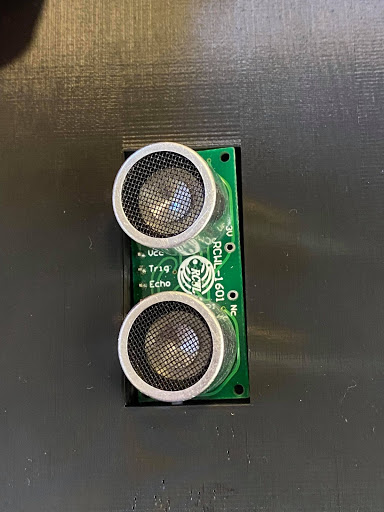
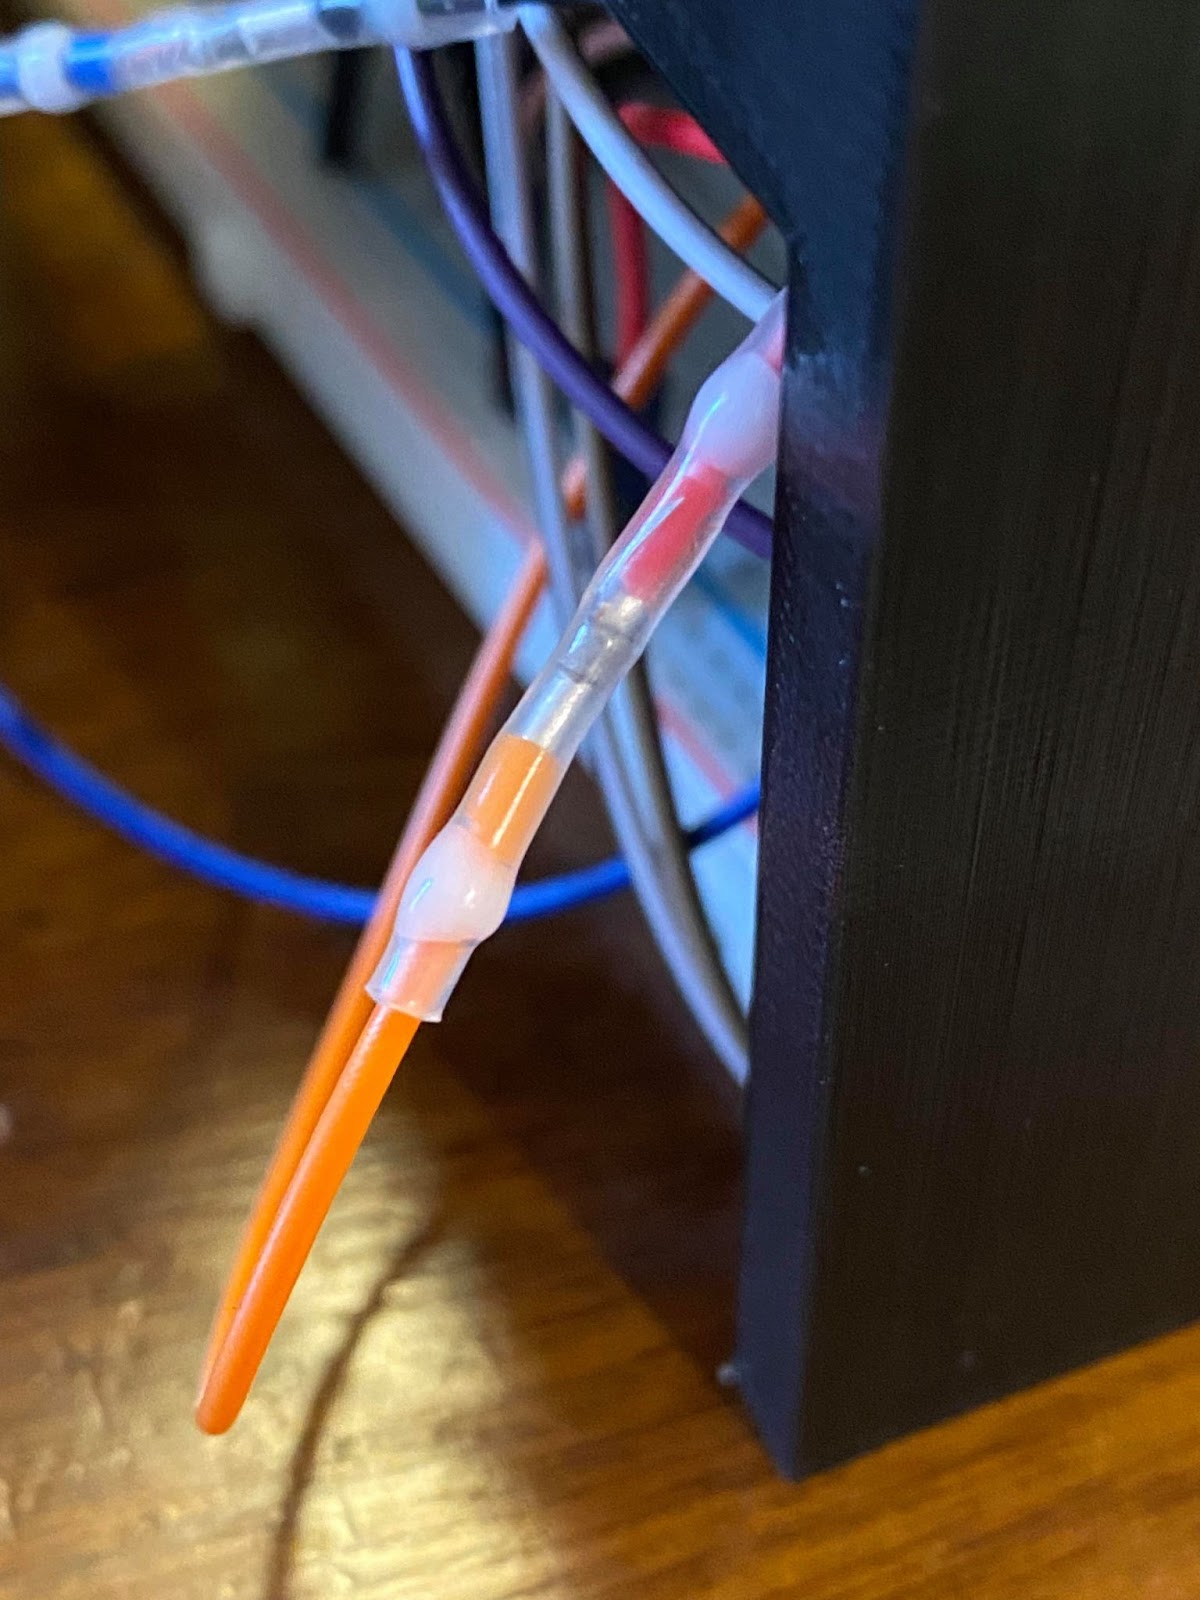
Figure 19: Sensor installation pictures
Finally, we connected the Raspberry Pi to our setup by sending the PiCobbler breakout cable through the designated cutout in the enclosure. However, when we measured the hardware setup with calipers, we failed to account for the power and AUX connection ports.- ideally, the ledge that holds the Raspberry Pi in our structure would have cutouts for these ports so that we could stand it up vertically. To leave room for the ports, we sat the Raspberry Pi horizontally on the stand, and mounted the PiCamera to the vertical part of the stand.
Results
Overall, during the course of our final project we were able to accomplish all of the milestones that we planned in our initial project proposal. Our video demo can be seen at the YouTube video linked at the top of this webpage. We did run into a small roadblock during our demo where one team member’s PiTFT touch chip broke an hour before the demo, but since we each prototyped a device, we were able to display touch capabilities on one prototype and the rest of both systems worked as expected.
Future Works
There are a variety of extensions that can be built to improve on this project. The first improvement would be to integrate our system with Spotify’s API, to support an unlimited cloud-based library rather than being limited to the mp3 downloads on the Raspberry Pi’s local system.
We could also improve our mounting scheme, by including ports for the AUX and power cords as mentioned before, and by changing the break-beam sensor formation so that the user does not need to use both hands to trigger play/pause. For example, if we set up the sensors in an ‘X’ formation, we could trigger skipping forwards/backwards by gesturing close to a single emitter, and could trigger play/pause by gesturing in the center of the ‘X’ which would trigger all both beams to be broken with a single hand.
On the sensor reading side of the software system, we could have improved our processing efficiency by implementing interrupts for the break-beam sensors, rather than a polling-based control scheme.
Finally, to make the project truly touchless and create a far more complicated extension to the project, we could try to work with OpenCV for the entire GUI process to detect the user’s hand in a certain location and project it on to the PiTFT screen to trigger “touchless click” events on certain buttons, rather than using the mouse click events we were taught in labs.
Conclusion
For our final project demonstration, our team was able to achieve everything that we laid out in our initial design proposal. We successfully implemented a gesture based music controller with our break-beam and ultrasonic sensors, and we were able to harness the power of OpenCV to use QR codes to link playlists to specific users. We also developed a full Pygame GUI interface to display instructions, visual playback status indicators, and the scanning process to the user, as well as a new user-specific interface with the option to select songs linked to a QR code on the display that the user could save for later use with a smartphone camera.
Over the course of the project, we discovered some challenges in hardware/software integration, which taught us to work with level shifters as well as different GPIO reading schemes (including looking for falling edges as we had done in previous labs, and measuring pulse widths). We also encountered challenges in the process of integrating our electrical hardware with a simple mechanical system - neither team member had much experience with mechanical design, so it was a great learning experience to work to develop a mounting scheme that supported our electronics in an elegant and contained manner, and we have a lessons to take away to improve on what we learned in that respect on future projects.
Bill of Material
The bill of materials for this project can be found here
Work Distribution

Tamzid Ahmed
ta326@cornell.edu
ECE '21

Claire Caplan
crc236@cornell.edu
ECE '21
Claire Caplan: hardware schematic design/Fritzing project, 3D printing and CAD, sensor testing, volume control code, and music player portion of GUI
Tamzid Ahmed: OpenCV and QR code detection, working with PiCamera video feed on PiTFT, new user, start/instructions, and scanning portions of GUI
References
PiCamera DocumentPigpio Library
R-Pi GPIO Document
Hand gesture computer vision tutorial
ECE 5725 Air Painter project
ECE 5725 Tracking Robotic Car project
Code Appendix
Github Repositorydisplay.py
                # author Tamzid Ahmed(ta326) and Claire Caplan(crc235)
# main script to start the player
# date: 05/06/2021
#import cv2
import RPi.GPIO as GPIO
import os
import pygame, sys
import pygame.display
import time
import sensor
import new_user
import cv2
from pygame.locals import *
from pygame.locals import *
GPIO.setmode(GPIO.BCM)
GPIO.setup(27, GPIO.IN, pull_up_down=GPIO.PUD_UP)
red =  (255,0,0)
green =  (0,   255,   0)
black = 0, 0, 0
white = 255,255,255
# setting up environment varialble for piTFT
os.putenv('SDL_VIDEODRIVER', 'fbcon')
os.putenv('SDL_FBDEV', '/dev/fb0')
os.putenv('SDL_MOUSEDRV', 'TSLIB')
os.putenv('SDL_MOUSEDEV', '/dev/input/touchscreen')
# taken from aircanvas project
#Rescales the output frame to 320 x 240 screen
def rescale_frame(frame, wpercent=130, hpercent=130):
    width = int(frame.shape[1] * wpercent / 100)
    #print("width: " + str(width) "\n height" )
    height = int(frame.shape[0] * hpercent / 100)
    return cv2.resize(frame, (320, 240), interpolation=cv2.INTER_AREA)
pygame.init()
pygame.mouse.set_visible(True)
size = width, height = 320, 240
screen = pygame.display.set_mode(size)
my_font = pygame.font.Font(None,30)
log_font = pygame.font.Font(None,20)
my_font_coord = pygame.font.Font(None,20)
b1 = (150,110)
b2 = (240,220)
start_screen_buttons = {'Quit':(240,220), 'Start':(80,220), 'Welcome to':(160,80), 'Touchless Music Player!': (160,100)}
#info_screen1_buttons = {'Quit':(240,220), 'Next':(80,220), 'Scan your QR code to load':(160,80), 'your personal playlist!': (160,100)}
info_screen1_buttons = {'Quit':(260,220), 'Next':(50,220), 'New User':(160,220), 'Scan your QR code to load':(160,80), 'your personal playlist!': (160,100)}
info_screen2_buttons = {'Quit':(240,220), 'Next':(80,220), 'Play/Pause: cover L/R sensors':(160,80), 'Next track: cover L sensor': (160,100),
                        'Previous track: cover R sensor': (160,120), 'Volume: Hand distance': (160,140), 'from center sensor':(160,160)}
my_buttons = {b1:'Scan', b2: 'Quit'}
cap = cv2.VideoCapture(0)
# QR code detection object
detector = cv2.QRCodeDetector()
scan = False
start_screen = True
info_screen1 = False
info_screen2 = False
scan_screen = False
music_screen = False
while (1):
    if ( not GPIO.input(27) ):
        print (" ")
        print ("Button 27 pressed")
        GPIO.cleanup()
        quit()

    screen.fill(black)
    if(start_screen):
        for my_text,text_pos in start_screen_buttons.items():
                text_surface = my_font.render(my_text,True,white)
                rect = text_surface.get_rect(center=text_pos)
                screen.blit(text_surface,rect)
        for event in pygame.event.get():
                if(event.type is MOUSEBUTTONDOWN):
                    pos = pygame.mouse.get_pos()
                if(event.type is MOUSEBUTTONUP):
                    pos = pygame.mouse.get_pos()
                    x,y = pos
                    if y >200:
                        #if click in vicinity of quit button, quit
                        if x > 160:
                            print ( "quit button pressed" )
                            cv2.destroyAllWindows()
                            cap.release()
                            GPIO.cleanup()
                            quit()
                        #if click in vicinity of start button, set flag
                        if x < 160:
                            start_screen = False
                            info_screen1 = True
        pygame.display.flip()

    if(info_screen1):
        screen.fill(black)
        for my_text,text_pos in info_screen1_buttons.items():
                text_surface = my_font.render(my_text,True,white)
                rect = text_surface.get_rect(center=text_pos)
                screen.blit(text_surface,rect)
        for event in pygame.event.get():
                if(event.type is MOUSEBUTTONDOWN):
                    pos = pygame.mouse.get_pos()
                if(event.type is MOUSEBUTTONUP):
                    pos = pygame.mouse.get_pos()
                    x,y = pos
                    if y >200:
                        #if click in vicinity of next button, set flag
                        if x < 80:
                            info_screen1 = False
                            info_screen2 = True
                        elif x < 200:
                            print("hello")
                            new_user.create_new_user()
                        elif x > 220:
                            #if click in vicinity of quit button, quit
                            print ( "quit button pressed" )
                            cv2.destroyAllWindows()
                            cap.release()
                            GPIO.cleanup()
                            quit()
        pygame.display.flip()

    if(info_screen2):
        screen.fill(black)
        for my_text,text_pos in info_screen2_buttons.items():
                text_surface = my_font.render(my_text,True,white)
                rect = text_surface.get_rect(center=text_pos)
                screen.blit(text_surface,rect)
        for event in pygame.event.get():
                if(event.type is MOUSEBUTTONDOWN):
                    pos = pygame.mouse.get_pos()
                if(event.type is MOUSEBUTTONUP):
                    pos = pygame.mouse.get_pos()
                    x,y = pos
                    if y >200:
                        #if click in vicinity of quit button, quit
                        if x > 160:
                            print ( "quit button pressed" )
                            cv2.destroyAllWindows()
                            cap.release()
                            GPIO.cleanup()
                            quit()
                        #if click in vicinity of next button, set flag
                        if x < 160:
                            info_screen2 = False
                            scan_screen = True
        pygame.display.flip()

    if(scan_screen):
        screen.fill(black)
        # set up camera object
        pos = (150,110)
        if (my_buttons[b1] == 'scan'):
            rectangle = pygame.draw.rect(screen, red, pygame.Rect(90, 60, 120, 120))
            rectangle.move(pos)
        else:
            rectangle = pygame.draw.rect(screen, green, pygame.Rect(90, 60, 120, 120))
            rectangle.move(pos)
        for text_pos,my_text in my_buttons.items():
            if ( my_text == 'scan'):
                text_surface = my_font.render(my_text,True, white)
                rect = text_surface.get_rect(center=text_pos)
                screen.blit(text_surface,rect)
            else:
                text_surface = my_font.render(my_text,True, white)
                rect = text_surface.get_rect(center=text_pos)
                screen.blit(text_surface,rect)
        pygame.display.flip()
        for event in pygame.event.get():
                if(event.type is MOUSEBUTTONDOWN):
                    pos = pygame.mouse.get_pos()
                if(event.type is MOUSEBUTTONUP):
                    pos = pygame.mouse.get_pos()
                    x,y = pos
                    if ( y > 180 ):
                        if ( x > 190 ):
                            print ( "quit button pressed" )
                            cv2.destroyAllWindows()
                            cap.release()
                            GPIO.cleanup()
                            quit()
                    if ( y > 30 and y < 170 ):
                        if ( x> 30 and x < 170):
                            scan = True

        #video_width = cap.get(cv2.CAP_PROP_FRAME_WIDTH)
        #video_height = cap.get(cv2.CAP_PROP_FRAME_HEIGHT)
        while scan:
            if ( not GPIO.input(27) ):
                print (" ")
                print ("Button 27 pressed")
                cv2.destroyAllWindows()
                cap.release()
                quit()
            for event in pygame.event.get():
                if(event.type is MOUSEBUTTONDOWN):
                    pos = pygame.mouse.get_pos()
                if(event.type is MOUSEBUTTONUP):
                    pos = pygame.mouse.get_pos()
                    x,y = pos
                    if ( y > 180 ):
                        if ( x > 190 ):
                            print ( "quit button pressed" )
                            cv2.destroyAllWindows()
                            cap.release()
                            GPIO.cleanup()
                            quit()

            # get the image
            _, img = cap.read()
            #Rescale the display frame to 320 x 240 pixels
            rescaled_frame = rescale_frame(img)
            surface = pygame.surfarray.make_surface(rescaled_frame.transpose(1,0,2)[...,::-1])
            surface.convert()
            screen.blit(surface, (0,0))
            pos = (150,110)
            pygame.display.flip()
            # get bounding box coords and data
            data, bbox, _ = detector.detectAndDecode(img)
            # if there is a bounding box, draw one, along with the data
            if(bbox is not None):
                for i in range(len(bbox)):
                    cv2.line(img, tuple(bbox[i][0]), tuple(bbox[(i+1) % len(bbox)][0]), color=(255,
                         0, 255), thickness=2)
                cv2.putText(img, data, (int(bbox[0][0][0]), int(bbox[0][0][1]) - 10), cv2.FONT_HERSHEY_SIMPLEX,
                        0.5, (0, 255, 0), 2)
            os.chdir('/home/pi/ece5725_finalproject')
            if data:
                #time.sleep(1) # this stops continous detection of data
                print("data found: ", data)
                # display the image preview
                with open('netid.txt') as f:
                    lines = f.readlines()
                    for line in lines:
                        #print('line is ', line)
                        #print('data is ' , data)
                        if ( line.rstrip() == data ):
                            print("match found")
                            sensor.play_music(data)
                            os.chdir('/home/pi/ece5725_finalproject')
                            scan = False
                            scan_screen = False
                            start_screen = True
            if(cv2.waitKey(1) == ord("q")):
                break
    """

    if(music_screen):
        sensor.play_music('ta326')
        os.chdir('.') """


# free camera object and exit
cap.release()
cv2.destroyAllWindows()
GPIO.cleanup()
                  # author Tamzid Ahmed(ta326) and Claire Caplan(crc235)
# code for making playlist for a new user
# date: 05/10/2021
import time
import glob
import subprocess
import os
import pygame, sys
import pygame.display
import time
import RPi.GPIO as GPIO
from pygame.locals import *
from pygame.locals import *
import random
import string
import qrcode
import shutil # to copy files
# Improting Image class from PIL module
from PIL import Image
# settting up environment varialble for piTFT
os.putenv('SDL_VIDEODRIVER', 'fbcon')
os.putenv('SDL_FBDEV', '/dev/fb0')
os.putenv('SDL_MOUSEDRV', 'TSLIB')
os.putenv('SDL_MOUSEDEV', '/dev/input/touchscreen')
red =  (255,   0,   0)
green =  (0,   255,   0)
black = 0, 0, 0
white = 255,255,255
pygame.init()
pygame.mouse.set_visible(False)

#song covers
alone = pygame.image.load('/home/pi/ece5725_finalproject/playlist/song_library/album_covers/Alone - Marshmello.png')
animal = pygame.image.load('/home/pi/ece5725_finalproject/playlist/song_library/album_covers/Animals - Neon Trees.png')
bellyache = pygame.image.load('/home/pi/ece5725_finalproject/playlist/song_library/album_covers/Bellyache - Billie Eilish.png')
friends = pygame.image.load('/home/pi/ece5725_finalproject/playlist/song_library/album_covers/FRIENDS - Anne-Marie.png')
good_days = pygame.image.load('/home/pi/ece5725_finalproject/playlist/song_library/album_covers/Good Days - SZA.png')
beatles = pygame.image.load('/home/pi/ece5725_finalproject/playlist/song_library/album_covers/Help! - The Beatles.png')
paradise = pygame.image.load('/home/pi/ece5725_finalproject/playlist/song_library/album_covers/Paradise - Coldplay.png')
shy_away = pygame.image.load('/home/pi/ece5725_finalproject/playlist/song_library/album_covers/Shy Away - 21 Pilots.png')
solo = pygame.image.load('/home/pi/ece5725_finalproject/playlist/song_library/album_covers/Solo - Clean Bandit.png')

cover_list = [animal, alone, bellyache, good_days, beatles, shy_away, solo, friends, beatles, paradise]

size = width, height = 320, 240
screen = pygame.display.set_mode(size)
new_user_buttons = {'Prev':(50,220),'Next':(120,220), 'Select':(190,220), 'Done':(270,220)}
qr_screen_buttons = {'Song Selection':(240,220), 'Take a ':(260,80), ' picture of ': (260,100), 'your QR' : (260,120), 'code' : (260,140)}
b1 = (140,20)
current_song = {b1:'song name is very long it is'}
my_font = pygame.font.Font(None,30)
os.chdir('./playlist/song_library')
f = glob.glob('*mp3')

#length = len(f)
#pointer = 0
def select_playlist():
    #f = glob.glob('*mp3')
    length = len(f)
    pointer = 0
    while(1):
        screen.fill(black)
        current_song[b1] = f[pointer]
        current_cover = cover_list[pointer]
        cover_rect = current_cover.get_rect()
        cover_rect = cover_rect.move(100,65)
        screen.blit(current_cover, cover_rect)
        playlist_dir = '/home/pi/ece5725_finalproject/playlist/song_library' # for now use this but chnage it to actual folder later
        for my_text,text_pos in new_user_buttons.items():
            text_surface = my_font.render(my_text,True,white)
            rect = text_surface.get_rect(center=text_pos)
            screen.blit(text_surface,rect)
        for text_pos,my_text in current_song.items():
            text_surface = my_font.render(my_text,True,white)
            rect = text_surface.get_rect(center=text_pos)
            screen.blit(text_surface,rect)
        for event in pygame.event.get():
            if(event.type is MOUSEBUTTONDOWN):
                pos = pygame.mouse.get_pos()
            if(event.type is MOUSEBUTTONUP):
                pos = pygame.mouse.get_pos()
                x,y = pos
                if y > 180:
                        #if click in vicinity of quit button, quit
                    if x < 150:
                        print ( "next button pressed" )
                        pointer = pointer + 1
                        if (pointer == length):
                            pointer = 0
                        #if click in vicinity of quit button, quit
                    elif x < 80:
                        print ( "prev button pressed" )
                        pointer = pointer - 1
                        if (pointer == -1):
                            pointer = length - 1
                    elif x < 220:
                        print ("selecting current song")
                        shutil.copy(os.path.join(playlist_dir, f[pointer]), '.') # copy the song to the user playlist
                    else:
                        print("done")
                        return

        pygame.display.flip()
def create_new_user():
    letters = string.ascii_lowercase
    user = ''.join(random.choice(letters) for i in range(5)) # make a new random userid
    print(user)
    netid = open('/home/pi/ece5725_finalproject/netid.txt', 'a')
    netid.write(user)
    netid.write('\n')
    code = qrcode.make(user) # make a qr code
    code.save('/home/pi/ece5725_finalproject/qrcode/'+user+'.png') # save the qr code
    # make a play list corresponding to the new user
    path = '/home/pi/ece5725_finalproject/playlist/'+user
    os.makedirs(path)
    completeName = os.path.join('/home/pi/ece5725_finalproject/qrcode/', user+".png")
    code.save(completeName)
    im = Image.open(completeName)
    im = im.resize((200,200)) # resize the image to make it fit on piTFT
    im.save("test.png")
    #qr = pygame.image.load(completeName)
    qr = pygame.image.load("test.png")
    # change directory to current user's playlist
    directory = '/home/pi/ece5725_finalproject/playlist/'
    directory += user
    os.chdir(directory)
    while(1):
        screen.fill(black)
        qr_rect = qr.get_rect()
        qr_rect = qr_rect.move(0,0)
        screen.blit(qr,qr_rect)
        for my_text,text_pos in qr_screen_buttons.items():
            text_surface = my_font.render(my_text,True,white)
            rect = text_surface.get_rect(center=text_pos)
            screen.blit(text_surface,rect)
        pygame.display.flip()
        for event in pygame.event.get():
            if(event.type is MOUSEBUTTONDOWN):
                pos = pygame.mouse.get_pos()
            if(event.type is MOUSEBUTTONUP):
                pos = pygame.mouse.get_pos()
                x,y = pos
                if y >200 and x > 160: # clicked around song selction
                    select_playlist()
                    return
sensor.py
                    # author Tamzid Ahmed(ta326) and Claire Caplan(crc235)
# code for sensing hand gesture code
# date: 05/10/2021
import RPi.GPIO as GPIO
import time
import glob
import subprocess
import os
import pygame, sys
import pygame.display
import time
from pygame.locals import *
from pygame.locals import *
# settting up environment varialble for piTFT
os.putenv('SDL_VIDEODRIVER', 'fbcon')
os.putenv('SDL_FBDEV', '/dev/fb0')
os.putenv('SDL_MOUSEDRV', 'TSLIB')
os.putenv('SDL_MOUSEDEV', '/dev/input/touchscreen')
GPIO.setmode(GPIO.BCM)
GPIO.setup(23, GPIO.IN, pull_up_down=GPIO.PUD_UP)
red =  (255,   0,   0)
green =  (0,   255,   0)
black = 0, 0, 0
white = 255,255,255
play = pygame.image.load("./button_blue_play.png")
pause = pygame.image.load("./button_blue_pause.png")
vol_icon = pygame.image.load("./vol_icon.png")
pygame.init()
pygame.mouse.set_visible(True)
size = width, height = 320, 240
screen = pygame.display.set_mode(size)
b1 = (140,20)
my_song = {b1:'song name is very long it is'}
my_font = pygame.font.Font(None,30)
play_buttons = {'Quit':(240,220)}
TRIGGER = 26
ECHO = 4
#LEFT = 12
LEFT = 6
RIGHT = 16

GPIO.setmode(GPIO.BCM)
GPIO.setup(RIGHT, GPIO.IN) # right sensor
GPIO.setup(LEFT, GPIO.IN)  # left sensor
GPIO.setup(TRIGGER, GPIO.OUT)
GPIO.setup(ECHO, GPIO.IN)
# covering both sensor, pause play
# right sensor go forward
# left sensor go backward

def distance():

    #print('sensor settling')
    GPIO.output(TRIGGER, GPIO.LOW)
    time.sleep(0.5)

    #print('calculating distance')
    GPIO.output(TRIGGER, GPIO.HIGH)
    time.sleep(0.00001)
    GPIO.output(TRIGGER, GPIO.LOW)

    while GPIO.input(ECHO)==0:
        pulse_start_time = time.time()
    while GPIO.input(ECHO)==1:
        pulse_end_time = time.time()

    pulse_duration = pulse_end_time - pulse_start_time
    #print('got pulse duration')
    distance = round(pulse_duration * 17150, 2)

    return distance

def set_directory(user):
    directory = '/home/pi/ece5725_finalproject/playlist/'
    directory += user
    os.chdir(directory)
    return directory

def start_player(f,pointer):
    print(pointer)
    return subprocess.Popen(["omxplayer",f[pointer]],stdin=subprocess.PIPE,bufsize=0)
def play_music(user):
    directory = set_directory(user)
    f = glob.glob('*mp3')
    pointer = 0
    volume = 8
    print(f)
    print(len(f[pointer][0:27]))
    print("hello")
    player = start_player(f,pointer)
    length = len(f)
    paused = False
    while (1):
        if ( not GPIO.input(23) ):
            print (" ")
            print ("Button 23 pressed, quitting music")
            player.stdin.write(b'q')
            #quit()
            return
        screen.fill(black)
        volrect = vol_icon.get_rect()
        volrect = volrect.move(10,40)
        screen.blit(vol_icon, volrect)
        for i in range(volume):
            vol_bar = pygame.draw.rect(screen, white, pygame.Rect(5, (70+15*i), 30, 5))
        if (paused):
            playrect = play.get_rect()
            playrect = playrect.move(100,80)
            screen.blit(play, playrect)
        else:
            pauserect = pause.get_rect()
            pauserect = pauserect.move(100,80)
            screen.blit(pause, pauserect)
        my_song[b1] = f[pointer][0:27]
        for text_pos,my_text in my_song.items():
	        text_surface = my_font.render(my_text,True, white)
	        rect = text_surface.get_rect(center=text_pos)
	        screen.blit(text_surface,rect)
        for my_text,text_pos in play_buttons.items():
	        text_surface = my_font.render(my_text,True, white)
	        rect = text_surface.get_rect(center=text_pos)
	        screen.blit(text_surface,rect)
        pygame.display.flip()
        dist = int(distance())

        if(dist>=0 and dist<=10):
            vol = dist
            #print(dist)

            counter = 0
            if(vol>volume):
                for counter in range(1,vol-volume):
                    player.stdin.write(b'+')
                    volume = volume + 1
                    time.sleep(0.1)
                    print(counter)
            elif(vol200:
                    if x > 160:
                        player.stdin.write(b'q')
                        return # quit button pressed